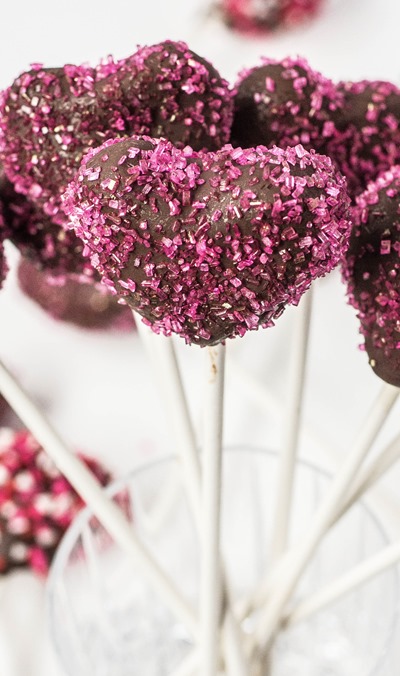
Fudgy delicious brownie pops made from scratch! These heart-shaped treats are perfect for Valentine’s Day!

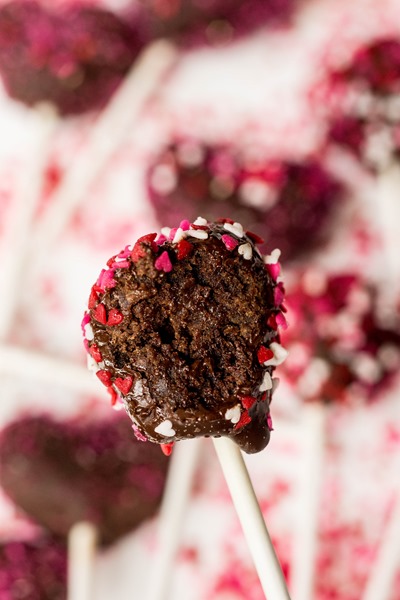
I was in the mood to make something pretty, fun and ultra delicious for Valentine’s Day this year. And while I love cake pops, the idea of brownie pops came to mind for a change. So instead of making a cake AND buttercream I made the ultimate fudgy brownies and turned them into pops. The texture of the brownies is actually perfect for molding (they are that fudgy) so no frosting needed! Plus, dipping the pops in chocolate really seals in the moisture. It makes them ideal for when you need to make a treat ahead of time. Class parties, Valentine’s Day soirees, or even bridal showers would be perfect excuses for these pretty heart-shaped pops.
")
When I started making them, I actually made balls at first. And then in a moment of déjà vu, I remembered that my mom and I had made hundreds of heart-shaped cake pops a few years ago for an Anthropologie event. And what do you know, making a ball shape into a heart is actually super easy. You just have to pinch the bottom, press a thumb into the top and voila. Something extra festive for a love-themed occasion.

And a little confession so you know just how much we loved these. The recipe makes about 50 heart-shaped brownie pops and I only shared a few of them. Maybe a dozen at most? I just couldn’t bring myself to give any more away. Oops.

- ½ pan of The Ultimate Fudgy Brownies, cooled
- 4-dozen 6-inch lollipop sticks
- 600g semi-sweet chocolate, roughly chopped or in disks
- ½ - 1 cup colored sprinkles
- Line a baking sheet with wax paper and set aside
- Cut sharp edges and corners off of brownies; break remaining brownie into pieces and place in a large bowl; mush together into a fudgy consistency
- Use a small cookie dough scoop or large spoon to scoop balls (about 1 tablespoon each) of dough onto wax paper
- Use your hands to roll the scoops into balls
- Cover with another sheet of wax paper and place in freezer for at least two hours
- Prepare another baking sheet with wax paper for finished pops, alternatively, have a large piece of styrofoam available for drying brownie pops
- Once balls are frozen, you can make the pops
- Put chocolate in a heat-safe bowl and place in over a pot of simmering water; stir chocolate constantly until melted (you can also melt in the microwave)
- Remove balls from freezer; dip the top of each lollipop stick about ¼ of an inch into the melted chocolate and immediately press into brownie ball two thirds of the way through
- (Optional) To make hearts: Pinch the bottom of each ball together with your fingers to form a rounded upside down triangle. Then, press your thumb into the top of the pop to create a dip for the top of the heart. Smooth out any imperfections by carefully using your fingers to mold the shape. Chill pops in freezer for an additional 15- 30 minutes or until firm again
- Once complete, dip each pop, one at a time, into melted chocolate; lightly tap off excess chocolate and place cake pop on wax paper or stick into styrofoam; decorate with sprinkles immediately before chocolate hardens
- Repeat until all pops are dipped and decorated
- Allow to cool and for chocolate to harden before serving
Cake pops can be made up to one week in advance of serving
- 256g unsweetened chocolate, roughly chopped
- 340g (1½ cups / 3 sticks) unsalted butter
- 415g (~2 cups) granulated sugar
- 400g (~1¾ cups, packed) light brown sugar
- 275g (~5 large) whole eggs, at room temperature
- 89 milliliters (6 tablespoon) strong brewed espresso (4 grams (1½ tablespoons) espresso + 89 milliliters (6 tablespoons) water))
- 10 milliliters (2 teaspoons) vanilla extract
- 290g (~2 cups + 2 tablespoons) all-purpose flour
- 2g (1/2 teaspoon) salt
- Pre-heat oven to 350 degrees;
- Line a 9x13 baking pan with parchment paper; set aside
- In a medium bowl, whisk together flour and salt; set aside
- Melt butter and chocolate in large pot over low to medium heat; remove when melted
- Stir in sugar until combined; stir in eggs, espresso and vanilla until smooth
- Whisk in flour mixture just until combined; do not overmix
- Pour batter into prepared baking dish and bake 40-45 minutes or until a knife comes out clean
- Set brownies aside to cool completely before using

Make something from the blog? Be sure to share it on Instagram with the tag #KeepItSweetDesserts.
You might also like:
Mini Chip Brownie Bites with Pink Marshmallow Buttercream


")

")


