Tag Archives: Low Fat

Easy Whole Wheat Banana Chocolate Chip Muffins

Healthier banana chocolate chip muffins are easy to make and great for grab-and-go breakfasts. No mixer needed to make this muffin recipe!

Banana Chocolate Chip Muffins! My family loves to grab these for a quick breakfast!

L’s appetite hasn’t been that great over the last week (teething? cold? toddler-itis? who knows!). But you better believe when I gave him one of these banana chocolate chip muffins that within minutes the muffin had disappeared and there was chocolate smeared all over his face. It took a lot of convincing to get him to go back to eating his hard boiled egg afterwards.

Healthier banana chocolate chip muffins are easy to make and great for grab-and-go breakfasts.

I’ve made a few different versions of this healthified banana muffin but this is my favorite one. It’s moist from the bananas while still hearty thanks to the whole wheat flour and oat bran. Plus, there are just enough chocolate chips to make the muffins feel treat-like while still being snack and even breakfast-friendly.

My kids LOVE these muffins! The recipe is healthy and easy but they don't know that;-)

Did I mention that these banana muffins are easy to make? No mixing bowl required! In fact, this is one of those recipes I can actually make while L is toddling around the apartment (aka sprinkling a trail of cheerios all over the floor and yelling “ha” (hot) at the oven.

Easy Banana Muffins for a healthy and quick weekday breakfast!

Easy Whole Wheat Banana Chocolate Chip Muffins
 
Healthier banana chocolate chip muffins are easy to make and great for grab-and-go breakfasts. No mixer needed to make this muffin recipe!
Author:
Recipe type: Breakfast
Makes: 12 muffins
Ingredients
  • 155g (1 cup) whole wheat flour
  • 55g (1/2 cup) oat bran
  • 5g (1 teaspoon) baking soda
  • 1g (¼ teaspoon) salt
  • (1/2g) ¼ teaspoon ground cinnamon
  • 210g (2/3 cup) mashed ripe bananas (~2 medium)
  • 106g (1/2 cup) granulated sugar ->106g
  • 60g (1/4 cup, packed) light brown sugar ->60g
  • 80g ( 2 x-large) egg whites
  • 2 milliliters (½ teaspoon) vanilla extract
  • 237 milliliters (1 cup) low fat buttermilk
  • 15 milliliters (1 tablespoon) canola oil
  • 110g (2/3 cup) mini semi-sweet chocolate chips
Instructions
  1. Pre-heat oven to 350 degrees; line a muffin tin with cupcake liners or spray with non-stick cooking spray and set aside
  2. In a medium bowl, whisk together flour, oat bran, baking soda, salt and cinnamon; set aside
  3. In a large bowl, whisk together remaining ingredients except for chocolate chips (bananas through buttermilk)
  4. Add dry ingredients and whisk just until combined (batter will be wet); fold in chocolate chips
  5. Use a large cookie dough scoop or ladle to evenly distribute batter into cups (each cup should be about ¾ full)
  6. Bake 20-25 minutes or until a toothpick comes out clean from center
  7. Store in an airtight container or ziplock bag at room temperature up to three days or in freezer up to one month (defrost overnight in container or in microwave for about 30 seconds)
Notes
Significantly adapted from these muffins.

Make something from the blog? Be sure to share it on Instagram with the tag #KeepItSweetDesserts.

You might also like:

Healthy Blueberry Banana Bread

Healthy Blueberry Banana Bread

Lighter Chocolate Chip Banana Cake

Lighter Chocolate Chip Banana Cake

Healthy Apple Cinnamon Muffins

Healthy Apple Cinnamon Muffins

Healthy Apple Cinnamon Muffins

A kid-friendly breakfast or snack, these healthy apple muffins are made with whole wheat flour and naturally sweetened!

Really Good Healthy Apple Cinnamon Muffins

When I think back to the first month after L was born, it comes back as a haze. Of course I remember the unbelievable sense of contentment I got when I’d snuggle on the couch with L curled up on my chest and the incredible connection that we seemed to make immediately. But while it was an amazing month, the limited broken sleep and c-section recovery turned my memories into a bit of a blur.

Healthy Whole Wheat Apple Cinnamon Muffins!

Want to know what else I remember clearly though? The hunger. There were only a couple of hours between feedings to rest and catch up on sleep so I’d sometimes choose my bed over food. But then, I’d wake up, I’d find myself starving with limited time to digest anything. I’d need food at that moment. Even more than that, food I could likely eat while holding and/or nursing a baby.

Healthy apple cinnamon muffins that are kid friendy!

So when my new neice was born a few weeks ago, I wanted to make something for my sister-in-law that could help with those moments of starvation when you don’t have time to think about what you are going to eat. You just need something ready and one-hand friendly. These healthy apple muffins really are the perfect solution for that kind of moment. They are full of whole grains, chopped apples and limited in sugars. In fact, I used maple syrup so there is no refined sugar at all! A healthy snack that tastes good and is quick to make and eat. It doesn’t get better than that when you have a newborn (okay, chocolate chunk cookies might be better than that).

Healthy Apple Cinnamon Muffins
 
A kid-friendly breakfast or snack, these healthy apple muffins are made with whole wheat flour and naturally sweetened!
Author:
Recipe type: Breakfast, Brunch, Snack
Makes: 12 muffins
Ingredients
  • 118 milliliters (1/2 cup) skim milk
  • 59 milliliters(1/4 cup) canola oil
  • 57g (1/4 cup) fat free plain greek yogurt
  • 118 milliliters (1/2 cup) maple syrup
  • 55g (1 large) whole egg at room temperature
  • 5 milliliters (1 teaspoon) vanilla extract
  • 160g (~1 cup) white whole wheat flour
  • 130g(~1 cup) all purpose flour
  • 5g (1 teaspoon) baking powder
  • 1g (1/4 teaspoon) baking soda
  • 2g (1 teaspoon) ground cinnamon
  • 1g (1/4 teaspoon) salt
  • 165g (1¾ cups) finely chopped Granny Smith apples (1-2 depending on size)
Instructions
  1. Pre-heat oven to 350 degrees; line a regular sized muffin pan with paper liners or spray with non-stick cooking spray
  2. In a medium bowl, whisk together wet ingredients (milk through vanilla) and set aside
  3. In a large bowl, whisk dry ingredients (flour through salt); form a well in center of dry ingredients and pour wet ingredients into the well
  4. Stir just until combined
  5. Fold in apples
  6. Distribute batter evenly in muffin pan and bake 15-20 minutes or until a toothpick comes out clean from center
  7. Allow to cool for five minutes before carefully removing muffins from pan; best served immediately
  8. Leftovers can be stored in an air-tight container at room temperature for a couple of days or in freezer for a few weeks

Make something from the blog? Be sure to share it on Instagram with the tag #KeepItSweetDesserts.

You might also like:

Gluten-Free Pumpkin Muffins

Gluten-Free Pumpkin Muffins

Cookie Butter Lava Whole Wheat Banana Muffins

Cookie Butter Lava Whole Wheat Banana Muffins

Whole Wheat Pistachio Muffins

Whole Wheat Pistachio Muffins


Lighter Chocolate Chip Banana Cake

Super moist banana cake loaded with chocolate but not loaded with fat!

Super moist banana cake loaded with chocolate but not loaded with fat!

My mom has made some version of this banana cake at least once (usually more) a year every year for as long as I can remember.  Chocolate chip filled for a holiday, chipless and stacked with chocolate cake and peanut butter frosting for an amazing layer cake, and loaded with cinnamon and chocolate chips just for fun.  We even made the cake completely fat free a couple of times years ago.  While the fat free version wasn’t bad at all, it was always pretty dense.  Adding some fat back into the cake (only 4 ounces for this large dessert), helped keep a bit of lightness.  And thanks to the bananas, you don’t have to worry about any dryness.  Of course the chocolate finds itself throughout the cake in a way that you definitely feel like you are indulging.  Win win!

I see this as the perfect brunch cake (or Yom Kippur /Break the Fast for those observing).  The sweet moist cake and crackly top is packed with bananas.  So really, you are actually adding another fruit dish to your meal…. right?!?!?!

Lighter Chocolate Chip Banana Cake - so moist you won't miss the guilt;-)

Lighter Chocolate Chip Banana Cake
 
Super moist banana cake loaded with chocolate but not loaded with fat!
Author:
Recipe type: Dessert
Makes: 12-16
Ingredients
  • 113g (1/2 cup) fat free plain Greek yogurt
  • 10g (2 teaspoons) baking soda
  • 320g (~3 cups) cake flour
  • 2g (1 teaspoon) ground cinnamon
  • 2 ½g (1/2 teaspoon) salt
  • 113g (1/2 cup) unsalted butter at room temperature
  • 122g (1/2 cup) unsweetened applesauce
  • 530g (1 pound 2 ¾ ounces) (~2 ½) cups granulated sugar
  • 200g (~4 large) whole eggs at room temperature
  • 20g (~1 large) egg whites at room temperature
  • 15 milliliters (1 tablespoon) vanilla extract
  • 570g (~2½ cups) mashed very ripe bananas (~4 large bananas)
  • 245g grated or finely chopped chocolate
Instructions
  1. Pre-heat oven to 350 degrees; grease and flour a 10-inch tube pan (you could also use a large bundt pan)
  2. In a small bowl, stir baking soda into Greek yogurt and let stand to dissolve
  3. In a medium bowl, whisk together cake flour, cinnamon and salt; set aside
  4. In the large bowl of an electric mixer, beat sugar, butter and applesauce on medium-high speed for several minutes until light and fluffy
  5. Add eggs and vanilla and mix on medium speed until combined; scrape the sides and bottom of the bowl with a rubber spatula
  6. Add bananas and mix on low speed; add flour and mix again on low speed low speed just until combined
  7. Remove bowl from mixer and fold in Greek yogurt; fold in chocolate
  8. Pour batter into prepared pan; bake 65-70 minutes or until a toothpick or knife comes out clean from the center; set pan aside on a wire rack and allow to cool for one hour
  9. When ready to remove cake from pans; run a knife around the edges of cake and then carefully pull the inside of the tube pan up to remove the cake (if you notice it is stuck at all, run your knife around the sides again, do not force); then run a knife underneath the cake and around center of tube and use your hands to gently lift cake and place on serving plate (again be careful not to force and make sure cake is completely cool)
  10. Best enjoyed within 24 hours; store leftovers tightly wrapped with seran
Notes
Adapted from the Har Zion Cookbook
Note: Entire cake can be frozen whole or in slices wrapped well with seran and foil up to one month; defrost at room temperature a few hours before serving

Lighter Chocolate Chip Banana Cake - perfect for brunch dessert


Make something from the blog? Be sure to share it on Instagram with the tag #KeepItSweetDesserts.

Chocolate Chunk Banana Ice Cream with Chocolate Fudge Ripple

This healthy version of ice cream is naturally vegan and gluten-free.
Healthy Banana Ice Cream full of Chocolate Fudge Chunks!

I’ve got another ice cream recipe for you that doesn’t require an ice cream maker!  Although, this one is a little different.  When I was in the midst of a baking rampage a few weeks ago, Matt asked if I could try to make something healthy.  Well, wish granted!  This isn’t your typical ice cream, and I’m not going to lie, it’s not as creamy as the fat-filled regular version.  But when you want a sweet frozen treat that is on the healthier side, this banana ice cream is perfect.

I’m not the first person to make banana ice cream in a blender, I’ve seen it done about four million times before.  But for my purposes, I wanted a flavor that felt a little more indulgent and didn’t leave my sweet tooth and cravings completely unsatisfied.  The fudge ripple and chocolate chunks through definitely do the trick!

Healthy Banana Ice Cream loaded with chocolate, no ice cream maker needed!


2.0 from 1 reviews
Chocolate Chunk Banana Ice Cream with Chocolate Fudge Ripple
 
Fudge Ripple Makes ½ cup Recipe from David Lebovitz via Epicurious
Author:
Recipe type: Dessert
Makes: ~3/4 quart (3-6 servings)
Ingredients
  • 610g (~4 large) frozen bananas, sliced
  • 60 milliliters (1/4 cup) almond milk
  • 5 milliliters (1 teaspoon) vanilla extract
  • 65g dark chocolate, chopped (check to make sure dairy-free if Vegan)
  • ¼ cup chocolate ripple (see below)
Instructions
  1. In a high-speed blender (I used a Vitamix) combine frozen bananas, almond milk and vanilla for several minutes or until completely combined; should be the consistency of soft serve yogurt
  2. Fold in chopped chocolate and pour into a regular sized loaf pan
  3. Drizzle with fudge ripple; cover with seran wrap or tin foil and freeze for at least 6 hours before serving

 
2.0 from 1 reviews
Chocolate Chunk Banana Ice Cream with Chocolate Fudge Ripple
 
Fudge Ripple Makes ½ cup Recipe from David Lebovitz via Epicurious
Author:
Recipe type: Dessert
Makes: ½ cup
Ingredients
  • 50g (~1/4 cup) granulated sugar
  • 50 milliliters (2 tablespoons + 2 teaspoons) light corn syrup
  • 60 milliliters (1/4 cup) water
  • 25g (~1/4 cup) unsweetened Dutch-process cocoa
  • 1 milliliter (1/4 teaspoon) vanilla extract
Instructions
  1. In a medium-sized saucepan over medium heat, whisk together sugar, corn syrup, water and cocoa powder; whisk constantly until mixture comes to a low boil
  2. Cook for one additional minute, still whisking and then remove from heat
  3. Stir in vanilla
  4. Chill in refrigerator for at least one hour or until ready to use (up to two weeks)
Notes


Vegan Banana Ice Cream with Chocolate Fudge Ripple and Chocolate Chunks!

No guilt necessary!

Make something from the blog? Be sure to share it on Instagram with the tag #KeepItSweetDesserts.

Healthy Pumpkin Banana Oatmeal Breakfast Bake {gluten-free, dairy-free}

This make-ahead breakfast bake is healthy, hearty and tasty!  Full of pumpkin, bananas and oatmeal, you will feel good serving this to your family for breakfast.

Healthy Pumpkin Banana Oatmeal Breakfast Bake {gluten-free, dairy-free}

Confession:  This recipe is already on the blog.

Healthy Pumpkin Banana Oatmeal Breakfast Bake {gluten-free, dairy-free}

But…. ouch!  I realize that something like this is hard to photograph, but those pictures were just so  bad.  And the writing?  I think it took me a year to find my voice.  Every time I read an early post it just feels so awkward.  It’s almost as bad as reading your diary from middle school.  Yikes, was that really me?

Healthy Pumpkin Banana Oatmeal Breakfast Bake {gluten-free, dairy-free}

I’m hoping to go through some other old posts to do them over as well.  I’m sure some of my recipe directions weren’t as clear as they can be and I’d just really love to have better pictures of some poor desserts that are stuck looking ugly.  Did this really happen?  Did I think this was appetizing (scroll down)?

Healthy Pumpkin Banana Oatmeal Breakfast Bake {gluten-free, dairy-free}

Healthy Pumpkin Banana Oatmeal Breakfast Bake {gluten-free, dairy-free}
 
This make-ahead breakfast bake is healthy, hearty and tasty! Full of pumpkin, bananas and oatmeal, you will feel good serving this to your family for breakfast.
Author:
Recipe type: Breakfast, Brunch
Makes: 4-6 servings
Ingredients
  • 6 ounces (~2 cups) rolled oats*
  • 2 teaspoons pumpkin pie spice
  • 1½ teaspoons baking powder
  • ⅛ teaspoon salt
  • ⅔ cup canned pumpkin (not pumpkin pie filling)
  • 6 fluid ounces unsweetened vanilla almond milk (skim milk or soy milk can be subbed)
  • 4 fluid ounces egg replacement or egg whites (equivalent of about 3 egg whites)
  • 5 ounces (~1/2 cup) mashed brown ripe bananas (~2 small or 1 large)
  • 1 teaspoon vanilla extract
Instructions
  1. Pre-heat oven to 350 degrees.
  2. Spray a 9×9 baking dish with non-stick cooking spray
  3. In a medium bowl, whisk together dry ingredients and set aside
  4. In a large bowl, whisk together remaining ingredients
  5. Stir dry ingredients into wet ingredients just until mixed
  6. Pour into prepared baking dish and bake for 23-28 minutes in middle of oven, or until a knife comes out clean from center
  7. Serve immediately or store covered at room temperature up to three days; can also be wrapped and frozen for an easy weekday breakfast
Notes
*Check that your ingredients are labeled gluten-free if avoiding gluten
There is no added sugar to this recipe, if you are looking for a very sweet breakfast, I suggest topping with maple syrup
Additional toppings might include greek yogurt, nut butter, sliced almonds and cooked fruit

And in honor of learning how to use a camera, I created a fun little GIF.

Healthy Pumpkin Banana Oatmeal Breakfast Bake {gluten-free, dairy-free} on Make A Gif

make animated gifs like this at MakeAGif

P.S. Head over to Erin’s site for a Keep It Sweet Desserts giveaway!

Make something from the blog? Be sure to share it on Instagram with the tag #KeepItSweetDesserts.

You might also like:

Cinnamon Chip Whole Wheat Pumpkin Scones

Cinnamon Chip Whole Wheat Pumpkin Scones

Whole Wheat Pumpkin Cinnamon Swirl Bread

Whole-Wheat-Pumpkin-Cinnamon-Swirl-Bread-7_thumb.jpg

My Favorite Pumpkin Bread

Seriously good (and easy) pumpkin bread

Brown Butter Chocolate Chip Quinoa Banana Bread

This hearty but moist banana bread is healthy enough for breakfast while still being sweet enough to feel like a treat.

Brown Butter Chocolate Chip Quinoa Banana Bread

I have so much good stuff for you.  There was basically a three-day baking marathon to get ahead on blog posts.  The problem is, whenever I build up some recipe inventory, I have the hardest time waiting to share everything.

Brown Butter Chocolate Chip Quinoa Banana Bread

This banana bread isn’t quite the most exciting recipe of the bunch, but it was necessary.  Sometimes you just need a baked good that isn’t going to give you an internal guilt trip if you eat it for breakfast!  Plus, with the bazillion brown bananas on my counter, banana bread was inevitable (my frozen banana collection is already out of control).

What I love about this recipe is that the banana bread came out moist but hearty.  I had a habit of cutting off a bit at a time until a huge slice was devoured, but Matt also enjoyed it for snacks over the course of a few days.  I think his favorite way to eat it was toasted with a smear of almond butter.

Brown Butter Chocolate Chip Quinoa Banana Bread

Quinoa flour is an ingredient I’ve never used before.  It’s actually commonly used in gluten-free recipes (there are some here), which is why I bought it in the first place, but I had bookmarked this high protein banana bread on Madison’s site a few months ago and decided to try it out.  Wondering where to get quinoa flour?  I actually found it at TJ Maxx (random much?), but Whole Foods, health food stores and Amazon are probably good resources as well.  I’m looking forward to playing around with it in future recipes!

Brown Butter Chocolate Chip Quinoa Banana Bread

Brown Butter Chocolate Chip Quinoa Banana Bread
 
This hearty but moist banana bread is healthy enough for breakfast while still being sweet enough to feel like a treat.
Makes: 8 nice-sized slices
Ingredients
  • 2 ounces (4 tablespoons / ½ stick) unsalted butter, softened
  • 6⅞ ounces (1¼ cups) white whole wheat flour
  • 2 ounces (~1/2 cup) quinoa flour
  • 10½ ounces (~1 cup) mashed brown banana (~3 medium)
  • 1⅞ ounces (~1/4 cup) granulated sugar
  • 1 x-large egg lightly beaten, at room temperature
  • 1 teaspoon vanilla extract
  • ¼ cup milk (any type will work, I used almond milk) at room temperature
  • 1 teaspoon baking soda
  • 1 teaspoon ground cinnamon
  • ½ teaspoon salt
  • 3½  ounces (~1/2 cup) mini semi-sweet chocolate chips
Instructions
  1. Pre-heat oven to 350 degrees; lightly grease and flour a loaf pan; set aside
  2. Brown the butter: Heat butter in a small heavy saucepan over medium heat, stirring constantly, when butter turns to an amber/light brown color, remove from heat immediately (You should be able to smell the deeper more caramel flavor of the butter) pour browned butter immediately into a small bowl and set aside to cool
  3. In a medium bowl, whisk together flours; set aside
  4. In a large bowl, combine banana browned butter, sugar, egg, and vanilla; whisk until all ingredients are combined
  5. Add milk, baking soda, cinnamon and salt; whisk until combined
  6. Slowly whisk in flour mixture and do NOT overmix; when flour is ALMOST combined, fold in chocolate chips; again, do not overmix
  7. Pour batter into prepared pan and bake for 40-45 minutes or until knife comes out clean from center
  8. Set aside to cool before removing from pan to slice
Notes
Very slightly adapted from Espresso and Cream
Store tightly wrapped with seran wrap for a few days; you can also freeze individually wrapped slices for future snacking
The brown butter isn’t prominent and you could likely just melt the butter instead, but I do think it added just a little something to the recipe


Brown Butter Chocolate Chip Quinoa Banana Bread

Get ready for more butter, more sugar, and more indulging over the next few weeks.

Make something from the blog? Be sure to share it on Instagram with the tag #KeepItSweetDesserts.

You might also like:

Healthy Blueberry Banana Bread

Healthy Blueberry Banana Bread

Vanilla Roasted Strawberry Banana Bread

Vanilla Roasted Strawberry Banana Bread

Gluten-Free Chocolate Chunk Blueberry Banana Bread

Gluten-Free Chocolate Chunk Blueberry Banana Bread


Vanilla Roasted Strawberry Banana Bread that is Low Fat and Whole Wheat

Healthy banana bread full of delicious vanilla roasted strawberries.

Vanilla Roasted Strawberry Banana Bread that is Low Fat and Whole Wheat

It’s Tuesday but I feel like I am still recovering from the long weekend!  I think it has something to do with 13+ hours of driving for a two-day trip, dancing all night long at my cousin’s wedding, and the hotel neighbors that found it necessary to blast music and yell at each other at 2am the night before we had a 6:30 departure time.  That’s always fun.

Vanilla Roasted Strawberry Banana Bread that is Low Fat and Whole Wheat

But all in all, it really was a great weekend!  The highlight was being reunited with my dad’s side of the family.  We realized that it has been about twenty five years since all of the cousins were in the same place at the same time.  There were seven of us then.  This time around, with marriages, and a new generation, there were twelve of us.  While there has been a lot of loss on that side of the family, it is a definite bright spot to see so many of us starting wonderful families of our own.  Hopefully the next time we all meet, it won’t be so long from now and there will be even more of us.

Vanilla Roasted Strawberry Banana Bread that is Low Fat and Whole Wheat

I made this banana bread a few weeks ago when Matt’s friends were in town.  There were a few extra brown bananas on the counter and I had a little baking marathon.  The banana bread wasn’t as big of a hit as the blueberry pie, but it was a good healthy snack and breakfast addition.

Vanilla Roasted Strawberry Banana Bread that is Low Fat and Whole Wheat

The best part of baking this banana bread was the unbelievable aroma from roasting the strawberries.  Next time I’m going to roast extra berries and use them as an ice cream topping.  It was hard to put them right into the batter instead of eating them straight up!

Vanilla Roasted Strawberry Banana Bread that is Low Fat and Whole Wheat
 
Healthy banana bread full of delicious vanilla roasted strawberries. Source: Skinny Taste Makes 8 nice-sized slices
Author:
Recipe type: Breakfast, Brunch
Makes: 8 servings
Ingredients
  • 7 ounces (~1⅓ cup) sliced strawberries plus 1 teaspoon vanilla extract for roasting
  • 6⅞ ounces (1¼ cups) white whole wheat flour
  • ¾ teaspoon baking soda baking soda
  • ¼ teaspoon salt
  • 2½ ounces (~1/2 cup lightly packed) brown sugar
  • 1 ounces (2 tablespoons) unsalted butter, softened at room temperature
  • 2 x-large egg whites at room temperature
  • 10½ ounces (~1 cup) mashed brown banana (~3 medium)
  • 2 tablespoons unsweetened applesauce
  • 1 teaspoon vanilla extract
Instructions
  1. Roast strawberries; pre-heat oven to 350 degrees and line a baking sheet with parchment paper; set aside
  2. Toss sliced strawberries with vanilla and spread out on prepared baking sheet
  3. Roast in oven for 20 minutes
  4. While strawberries are roasting, prepare rest of banana bread
  5. Spray a loaf pan with non-stick cooking spray and set aside
  6. In a medium bowl, whisk together dry ingredients (flour, baking soda and salt); set aside
  7. In the large bowl of an electric mixer, beat butter and brown sugar until light creamy; add egg whites and mix on medium speed for a minute
  8. Scrape sides of bowl; add banana, applesauce and vanilla; mix on medium speed until combined
  9. Reduce speed to low and slowly add dry ingredients just until combined, do not overmix batter
  10. Once strawberries are done cooking, gently fold them into batter; bake for 35-40 minutes or until a knife comes out clean from center of loaf
  11. Allow to cool before removing loaf from pan
  12. Best served immediately; store tightly wrapped in seran wrap up to 3 days at room temperature or freeze up to one month
Notes
Source: Skinny Taste


Vanilla Roasted Strawberry Banana Bread that is Low Fat and Whole Wheat

Make something from the blog? Be sure to share it on Instagram with the tag #KeepItSweetDesserts.

You might also like:

Healthy Blueberry Banana Bread

Healthy Blueberry Banana Bread

Brown Butter Chocolate Chip Quinoa Banana Bread

Brown Butter Chocolate Chip Quinoa Banana Bread

Healthy banana bread with vanilla roasted strawberries!

Cookie Butter Lava Whole Wheat Banana Muffins

Healthy banana muffins with a surprise cookie butter filling.

Cookie Butter Lava Whole Wheat Banana Muffins

I think I looked at about fifty different banana muffin and bread variations before finally deciding to make these muffins.  My objective was to make something healthy but special.  I didn’t want plain old banana bread and I sure didn’t want something that was boring and dry.

Cookie Butter Lava Whole Wheat Banana Muffins

Luckly, I had bookmarked Jenny’s recipe for these banana muffins a few months ago.  And since I wanted Matt to be able to enjoy the treat as well, I obviously had to trade out the peanut butter for something my husband wouldn’t make a face at.

Cookie Butter Lava Whole Wheat Banana Muffins

Considering I’ve had an open jar of Cookie Butter forever, it was the perfect solution.  The molten center full of oozing speculoos spread is the perfect surprise when you break open the otherwise wholesome banana muffin.  The muffins are actually low in fat and have the perfect balance of healthy enough for breakfast but good enough for dessert.  You know how I love that.

Oh, and considering I practically inhaled one when I went to just taste a sample, you know they are good.

Cookie Butter Lava Whole Wheat Banana MuffinsCookie Butter Lava Whole Wheat Banana Muffins

Cookie Butter Lava Whole Wheat Banana Muffins
 
Healthy banana muffins with a surprise cookie butter filling.
Author:
Recipe type: Breakfast, Brunch
Makes: 14 muffins
Ingredients
  • 1 cup Cookie Butter (or speculoos spread of choice)
  • ½ cup powdered sugar
  • 1 cup mashed brown bananas (about 2 medium)
  • 3¾ ounces (1/2 cup) granulated sugar
  • 2 ounces (1/4 cup, packed) light brown sugar
  • 2 x-large egg whites
  • ½ teaspoon vanilla extract
  • 1 cup low fat buttermilk
  • 5½ ounces (1 cup) whole wheat flour
  • 1¾ ounces (1/3 cup) oat bran
  • 1 teaspoon baking soda
  • ¼ teaspoon salt
  • ¼ teaspoon ground cinnamon
Instructions
  1. Pre-heat oven to 350 degrees; line a muffin tin with cupcake liners and set aside
  2. In a medium bowl, mix together cookie butter and powdered sugar
  3. Use a medium cookie dough (about 2 tablespoons) scoop to scoop a ball of cookie butter mixture into each cupcake liner
  4. In another medium bowl, whisk together flour, oat bran, baking soda, salt and cinnamon; set aside
  5. In a large bowl, whisk together remaining ingredients (bananas through buttermilk)
  6. Stir in dry ingredients just until combined
  7. Use a large cookie dough scoop or ladle to evenly distribute batter into cups (over and around cookie butter filling)
  8. Bake 20-25 minutes or until a knife comes out clean from center
  9. Note:  These muffins are best when they are still warm from the oven but are still good covered at room temperature for up to two days after baking.  To get the full lava effect, microwave the room temperature muffins for about 7 seconds each.
Notes
Significantly adapted from Picky Palate

Cookie Butter Lava Whole Wheat Banana Muffins

Make something from the blog? Be sure to share it on Instagram with the tag #KeepItSweetDesserts.

You might also like:

Chocolate Covered Cookie Butter Pretzels

Chocolate Covered Cookie Butter Pretzels

Lighter Chocolate Chip Banana Cake

Lighter Chocolate Chip Banana Cake

Healthy Blueberry Banana Bread

Healthy Blueberry Banana Bread

Easy Low Fat Pumpkin Sheet Cake

This 5-ingredient pumpkin cake is so good, you would never know it is guilt-free!

This past Saturday, I took some of my own advice and set aside a day where no work would be done!  It was actually something I scheduled a few weeks ago when the Jewish holidays had me swamped.  Scheduling time off is one of the best ways I can really force myself to take a break and a good way to motivate myself when things are a little crazy.

Easy Low Fat Pumpkin Sheet Cake from Keep It Sweet Desserts

The day off meant getting to hang out with Matt.  We did mostly everyday activities like working out, grocery shopping and watching TV, but that is just how I like it.  The highlight of Saturday, though, was homemade pizza and champagne for dinner with some junky movies on the television.  It was our second time making pizza dough from scratch and I was reminded of just how worthwhile the few extra minutes of making dough can be.

Easy Low Fat Pumpkin Sheet Cake from Keep It Sweet Desserts

Of course, I couldn’t end the day without dessert.  And since it was an “off” day, I let myself cheat a little with cake mix.  Oh, but in case you were worried I at least made two cakes: chocolate cake for Matt and pumpkin cake for me.  I couldn’t help myself.

Easy Low Fat Pumpkin Sheet Cake from Keep It Sweet Desserts

This cake recipe is actually a nod to my college days.  Cooking usually consisted of boca burgers, egg beaters and salads with the occasional stir fry thrown in.  And while I loved to bake, we didn’t keep many basic ingredients in the apartment so cake mix recipes were the perfect solution.  I actually made a version of this cake for my roomate’s birthday one year (miss you, Rach!).  Pretty sure she and I ate most of it ourselves…

Easy Low Fat Pumpkin Sheet Cake from Keep It Sweet Desserts

The best part about this cake (besides the short list of ingredients and ease of making) is how moist and delicious it is without having much fat.  The moisture in the pumpkin gives the cake a perfect texture and you don’t even need frosting.  But a cake without frosting, what fun would that be?

Easy Low Fat Pumpkin Sheet Cake
 
Low fat pumpkin cake that's so good you won't know it only took 5 ingredients!
Author:
Recipe type: Dessert
Makes: 15 servings
Ingredients
  • 1 15.25 box spice cake mix
  • 1 15-ounce can pure pumpkin (not pumpkin pie mix)
  • ½ cup water
  • 1 1.4 box pumpkin spice instant pudding
  • 1 cup light almond milk OR 1¼ cup skim milk
  • 1 8-ounce container fat free cool whip
  • Optional:  Fall sprinkles and gingersnap crumbs
Instructions
  1. Pre-heat oven to 350 degrees; spray a 9x13 baking dish with non-stick cooking spray and set aside
  2. In a large bowl, stir together cake mix, pumpkin and water until combined
  3. Spread into baking dish and bake 25-30 minutes or until a knife comes out clean from the center
  4. Set cake aside to cool and prepare frosting
  5. In a large bowl, whisk together pudding mix and milk for two minutes
  6. Fold in cool whip just until combined
  7. Spread frosting over cake and serve; store leftovers in refrigerator up to 3 days

Easy Low Fat Pumpkin Sheet Cake from Keep It Sweet Desserts

Make something from the blog? Be sure to share it on Instagram with the tag #KeepItSweetDesserts.

You might also like:

Healthy Pumpkin Banana Baked Oatmeal

Healthy Pumpkin Banana Baked Oatmeal

One Bowl Pumpkin Blondies

One Bowl Pumpkin Blondies

My Favorite Pumpkin Bread

My Favorite Pumpkin Bread

The Easiest Pumpkin Cake

Banana Brownie Chunk Greek Frozen Yogurt

Banana Brownie Chunk Greek Frozen Yogurt

Well, I think I am officially old.

Banana Brownie Chunk Greek Frozen Yogurt

My 28th birthday is on Tuesday and while I know that in the big picture that really isn’t old, I certainly feel it.  After a late night out in the city last night, my body is just begging for a day of rest.  A big difference from when I moved to New York six years ago.

cooking bananas for Banana Brownie Chunk Greek Frozen Yogurt

In fact, a lot of things have changed in those six years.  Jobs, twice.  Boyfriend turned fiance turned husband.  Sister turned real life best friend.* Studio turned one bedroom then into two.  Jean size.  Insecurities faded**.  Passions realized.  Parents seen more as equals.  Views on life.  Priorities.  Dislike of goat cheese to love of goat cheese.  Suits to chef coats.

*Well, that wasn’t exactly a change, just more of a realization

**Some

brownies for Banana Brownie Chunk Greek Frozen Yogurt

It is actually amazing how much has changed but then again there is a lot that stayed the same.  Love of dessert.  Partner in life.  Balance of health and pleasure.  Love of family.  Drive, motivation, determination.  Heart. Morals.  Devotion to peanut butter, pumpkin, and fresh baked cookies.  Joy in baking for others.  Desire to eat only worth-it foods.  And of course, a love of frozen yogurt.

making Banana Brownie Chunk Greek Frozen Yogurt

You knew I’d tie this recipe in somehow.  I’ve actually been meaning to make this recipe since the last frozen yogurt I made.  It just took most of the summer for me to remember to put the ice cream maker bowl back in the freezer.  Matt gets credit for that reminder.

Banana Brownie Chunk Greek Frozen Yogurt

This frozen yogurt is creamy and full of fudgy brownie chunks to add the perfect indulgent touch.  The only thing missing is a little peanut butter swirl but I figured I’d be better off if I made a dessert my husband would also eat.

Banana Brownie Chunk Greek Frozen Yogurt

Banana Brownie Chunk Greek Frozen Yogurt
 
Caramelized bananas and fudgy brownies make the best frozen yogurt!
Author:
Recipe type: Dessert
Makes: 1 quart
Ingredients
  • 3 large brown bananas cut into slices (about ¼ inch thick)
  • 2 tablespoons light brown sugar, tightly packed
  • ½ teaspoon cinnamon
  • 1 teaspoon unsalted butter
  • 1½ cups fat free plain Greek yogurt
  • 2 tablespoons granulated sugar
  • ⅓ cup fudgy brownie pieces, size based on preference
Instructions
  1. Place banana slices, brown sugar, cinnamon and butter in a heavy duty saucepan over medium-high heat; cook until bananas and sauce are very thick, stirring occasionally; remove from heat
  2. Place two thirds of the banana mixture in a food processor or blender and puree
  3. In a large bowl, combine yogurt, sugar and pureed bananas; fold in remaining banana mixture and brownies
  4. Place in refrigerator for one hour or until mixture has cooled
  5. Once cooled, freeze yogurt in ice cream maker as directed by manufacturer's instructions
  6. Serve immediately or store prepared frozen yogurt in freezer until ready to eat (allow to defrost and soften a few minutes before serving)
Notes
Already frozen ripe bananas will work just as well as fresh
This frozen yogurt isn't overly sweet making it the perfect base for a touch of hot fudge or peanut butter sauce and whipped cream

Oh, and beware.  This yogurt barely lasted a full day in my house.

Banana Brownie Chunk Greek Frozen Yogurt

Make something from the blog? Be sure to share it on Instagram with the tag #KeepItSweetDesserts.

You might also like:

Blueberry Chocolate Chunk Frozen Yogurt

Blueberry Chocolate Chunk Frozen Yogurt

Gingersnap Peach Crumble Ice Cream

Gingersnap Peach Crumble Ice Cream

Fudgy Brownie Ice Cream Sandwiches

Fudgy Brownie Ice Cream Sandwiches

Fudgy Brownie Crunch Banana Ice Cream Pie

Fudgy Brownie Crunch Banana Ice Cream Pie

I was talking to some friends a few weeks ago about working out, eating healthy, etc.  For as long as I remember I’ve worked out hard most days of the week and watched what I ate 80% of the time.

Fudgy Brownie Crunch Banana Ice Cream Pie

But when I started running a bakery full-time, things changed.  My days got longer and I started spending most of them on my feet.  My legs ache when I wake up in the morning and sometimes I’m too busy to care if I eat an extra broken cookie or five.

Fudgy Brownie Crunch Banana Ice Cream Pie

They said to me, “but I’m sure you get sick of the desserts.”

Fudgy Brownie Crunch Banana Ice Cream PieFudgy Brownie Crunch Banana Ice Cream Pie

I wish.  Sure, every once and a while I’ll get sick of one item.  For instance, I always have extra brownie edges, so for a few days I got sick of the brownies.  But then there were the oatmeal cookies to go to… and then the triple chocolates.  There is no getting “sick” of sweets in my world.  It is either a curse or a blessing.

For the most part, I put those extra pieces on reserve in my freezer for friends and family, but every once and a while a few times a week I break into the stash.  Last week I even told Matt, “I accidentally ate a cookie.”

Is that even possible?

Fudgy Brownie Crunch Banana Ice Cream Pie

So now that I know giving up dessert is pretty much impossible for this sugaraholic, I’m trying to find some items that are a good middle ground.  Not so healthy and fake-tasting that I end up eating what I was avoiding to begin with, but almost good for you but really satisfying so you think you are eating something else.

This pie is the perfect example of that.  There is an indulgent crunchy chocolate filling on the inside, but the other layers are lower in fat, including an “ice cream” made with bananas.  Fruit on the ingredient list means I can have an extra slice, right?  I also used a No Pudge brownie mix as well as fat free cool whip but you can use whatever you prefer.

Fudgy Brownie Crunch Banana Ice Cream Pie

Fudgy Brownie Crunch Banana Ice Cream Pie
This pie is adapted and inspired by an ice cream pie my mom used to make for me us.  When she finally gave me the recipe for the addicting crunchy filling I couldn’t wait to make a batch!
Serves 12

Ingredients:
1 package brownie mix plus ingredients called for on box
1/3 cup hot fudge, homemade or store bought
1 1/2 cups Chocolate Pie Crunch (below)
3 cups cool whip (1 1/2 8-ounce containers)
3 ripe medium bananas, broken into chunks and frozen

Directions:
Pre-heat oven according to brownie mix instructions
Grease or spray a 9-inch spring-form pan and set aside (if you pan is prone to leaking, wrap tin foil tightly around the bottom half)
Prepare brownie batter as directed on box; spread into prepared pan
Bake brownie for 20-25 minutes or until a knife comes out clean
While brownie is baking, prepare Chocolate Pie Crunch
When brownie is done, allow to cool for several minutes and then gently spread hot fudge over brownie while it is still warm
Sprinkle with 1 1/2 cups Chocolate Pie Crunch
When brownie has completely cooled, spread cool whip over top; cover pan with foil and freeze for 30 minutes or until cool whip layer is firm
Once cool whip layer is firm, make the banana “ice cream’; place frozen bananas in a food processor and run on high for a few minutes until mixture is thick and creamy
Spread banana ice cream over cool whip
Cover pan with foil and place back in freezer 2 hours or until banana ice cream is firm

[print_this]

Chocolate Pie Crunch
Makes 5 1/2 cups

Ingredients:

1 9-ounce package chocolate wafers
6 ounces semi-sweet chocolate, chopped
1 1/2 tablespoons canola oil

Directions:

Line a baking sheet with wax paper and set aside
Crush chocolate wafers into small pieces and place in a large bowl
Heat chocolate and oil in a small saucepan over low-medium heat, stirring constantly until mixture is melted and smooth
Pour over crushed wafers immediately and stir until all cookie pieces are coated
Spread mixture out on baking sheet and freeze for 10 minutes or until firm
Break into pea-sized pieces and store in a ziplock bag in freezer until ready for use

Extra can be stored in a ziplock bag in the freezer up to one month

Recipe courtesy of my mom who got it from a friend…

[/print_this]

Fudgy Brownie Crunch Banana Ice Cream Pie

This post is for PIE DAY (tomorrow June 20th)!  How are you celebrating?

Blueberry Chocolate Chunk Frozen Yogurt

Blueberry Chocolate Chunk Frozen Yogurt - low fat but delicious

This week has been full of ice cream but I’m sending you off on a long weekend with a real bang – I made something frozen and delicious and dare I say it…. healthy!  This frozen yogurt is full of great things like nonfat greek yogurt and blueberries, but even better than that it is full of flavor.  In an effort to kick off summer eating dessert while having clothes that fit I’ll be filling up on lots of this yogurt over the next few weeks.  While blueberry and chocolate are one of my favorite combinations, I see many more flavors happening very soon.

Blueberry Chocolate Chunk Frozen Yogurt - low fat but delicious

So many of you have left me extremely supportive comments, facebook messages, tweets and Instagram notes over the last few weeks and it is just so overwhelming.  I know a lot of you are curious as to what is going on behind the scenes with my business.  I’m thinking about posting a “day in the life” if that interests you.

Blueberry Chocolate Chunk Frozen Yogurt - low fat but delicious

As for how things are going… I am pleased to say that I couldn’t be happier.  The site launched just over two months ago and already I’ve processed over 100 online orders, catered several events, provided favors and gift fillers to a few different people and delivered desserts to a TV show’s cast and crew.  In the few moments that I’m not baking, I’m networking and  and strategizing ways to grow the business.  When I’m not doing either of those things, I’m brainstorming new recipes for the blog, Seasonal Desserts and Cookie of the Month Club.

Blueberry Chocolate Chunk Frozen Yogurt - low fat but delicious

The best part of everything has been the feedback that Keep It Sweet Desserts has received thus far.  It seems a bit silly that I am still nervous every time I send a package or deliver an order, because people are really loving my sweets.  While there has been a little bit of PR, most of the business so far is word of mouth.  Many customers are those who have received a box of cookies as a gift and are now passing on the sweets to someone else.  I could not ask for much more satisfaction than that.

Blueberry Chocolate Chunk Frozen Yogurt - low fat but delicious

Thank you again for being there for me through all of this!

Get the recipe for Blueberry Chocolate Chunk Frozen Yogurt here!

Triple Chocolate Muffins with a Peanut Butter Swirl

Low Fat Triple Chocolate Muffins with a Peanut Butter Swirl

Today was my first day back to real life.

The early morning alarm, a half-awake trip to the gym, and then that rush to shower, eat breakfast, pack lunch and basically race against the clock to get to the office on time.

Low Fat Triple Chocolate Muffins with a Peanut Butter Swirl

I didn’t like it. Did I spend the last three weeks recovering from extreme burnout? Yes. But unfortunately that didn’t change the feeling of anxiety that weighed me down for the last precious hours of official vacation. The freedom that I felt through the end of the year with my email turned off and my responsibilities at the office on hold was incredible. There was definitely more smiling during that period of time than any other similar block of time over the last twelve months.

Low Fat Triple Chocolate Muffins with a Peanut Butter Swirl

It isn’t that I’m not happy in general, it’s just that I usually put the stress of my job and even my company on my shoulders. I go home at night and think about the model that needs fixing, the capital that needs to be raised or the co-worker that doesn’t get their work done. I think about the meetings that need to be scheduled, the emails that have to be sent and the trips that need to be booked. My old boss once told me not to care so much. He said, “don’t take this the wrong way, but you care too much.” He reminded me that I can only do what I can do and everything else is out of my control. It is just a job.

Low Fat Triple Chocolate Muffins with a Peanut Butter Swirl

So as I get back to the usual routine I’ll try to put aside that usual level of stress that I carry with me and just breathe. I’ll take each day as it comes and put forth the work that makes me feel good and know that everything else will play itself out. And in the moments where I feel that sharp pain in the back of my neck I’ll take a deep breathe, have a cup of tea and when all else fails eat some chocolate.

Oh right, that is what this blog is about! I made these muffins for my 15th (!!!) annual Christmas Eve brunch with my best friends from home and they were a huge hit. Chocolaty and moist like a muffin should be, but even better than that, they are on the lighter side, perfect for your New Years diet resolutions!

Low Fat Triple Chocolate Muffins with a Peanut Butter Swirl
Triple Chocolate Muffins with a Peanut Butter Swirl
Makes 12 muffins

Ingredients:
1 3/4 cup all-purpose flour
1/2 cup packed light brown sugar
1/4 cup unsweetened cocoa powder
1 teaspoon baking powder
1 teaspoon baking soda
1/2 teaspoon salt
1 cup water, warm
1/4 cup canola oil
1 egg, lightly beaten
1 tablespoon red wine vinegar
1/3 cup mini semi-sweet chocolate chips
~1/4 cup chocolate peanut butter (such as PB & Co)

Directions:
Pre-heat oven to 350 degrees
Line a regular sized muffin tin with paper liners or spray with non-stick cooking spray; set aside
In a large bowl, whisk together all dry ingredients (flour through salt); set aside
In a medium bowl, whisk together wet ingredients (water through vinegar) and chocolate chips
Pour wet ingredients into dry ingredients and stir just until combined (there should still be some small lumps in the batter)
Pour batter into prepared muffin tin
Drop a teaspoon of peanut butter onto each unbaked muffin; use a toothpick to lightly swirl peanut butter around top of muffin
Bake muffins 12-14 minutes or until a toothpick comes out clean and muffin tops are firm
Allow muffins to cool a few minutes before removing from pan
Adapted from Cooking Light

Low Fat Triple Chocolate Muffins with a Peanut Butter Swirl

On a separate note, my posts may be a little less frequent over the next several weeks.  Stick with me because good things are to come!

Lighter Carrot Snack Cake with Cream Cheese Icing

Lighter Carrot Sheet Cake with Cream Cheese Icing 13

Ok, I’m going to be honest.  I’m posting a recipe for carrot cake and I don’t even like carrot cake.

Lighter Carrot Sheet Cake with Cream Cheese Icing 17

You see, I really thought I did.  Moist cake slathered in cream cheese icing, how could it be bad?  Well, of course my version that I thought I would like is void of raisins, walnuts and canned pineapple.  Those items in baked goods, especially the raisins, just don’t generally work for me.  I know there are a lot of carrot cake lovers out there getting very angry with me right about now.

Lighter Carrot Sheet Cake with Cream Cheese Icing 3

So I made this cake and was so excited that it was a little low in fat, full of a vegetable and in sheet cake form so that I could call it a snack cake (snack cake = anytime cake).  The flavor is great, the cake is nice and moist (not gummy or dry like some lighter baked goods) and of course the cream cheese icing calls for eating by the spoonful.  But still, I just can’t get behind it.  There is something about the carrots in the cake that bother me.  Sorry carrot cake, you are not for me.  Good thing there are other people around, like my husband, who feel differently!

Lighter Carrot Sheet Cake with Cream Cheese Icing 11

On a different note, let’s talk about this icing for a second.  I was contacted by Weight Watchers to try out their cream cheese in one of my recipes.  As someone who uses reduced fat cream cheese by default, I welcomed the chance to try a new (to me) brand.  The outcome was not disappointing at all.  The frosting on this cake was creamy and sweet with a little bit of that cream cheese tang.  I may or may not have scraped some off of the cake that I opted out of eating.  I’d definitely use their brand in future recipes.

[print_this]

Lighter Carrot Snack Cake with Cream Cheese Icing

Serves 16-20

Cake

2 cups all-purpose flour

2 teaspoons baking soda

1 teaspoon cinnamon

1/4 teaspoon salt

9 tablespoons unsalted butter, softened at room temperature

2/3 cup packed light brown sugar

1/2 cup granulated sugar

2 large eggs

2 large egg whites

2 teaspoons vanilla extract

3/4 cup low fat buttermilk

2 cups finely shredded carrots (about 5-6 large carrots)

Pre-heat oven to 350 degrees

Spray a 13×9 pan with cooking spray and set aside

In a medium bowl, whisk together flour, baking soda and salt; set aside

With an electric mixer, beat together butter and sugars on high speed until light and fluffy

Add eggs, one egg and egg white at a time, mixing between each

Mix in vanilla

Reduce mixer speed to low and gradually add flour mixture and buttermilk as follows: 1/3 of flour mixture, 1/2 of buttermilk, 1/3 of flour mixture, remaining 1/2 of buttermilk, remaining 1/3 flour mixture

Turn off mixture and fold in shredded carrots

Pour batter into prepared pan and bake for 25-30 minutes or until a knife or toothpick comes out clean

Set cake aside to cool

Cream Cheese Icing

1/2 of an 8-ounce block of Weight Watchers cream cheese, softened at room temperature

1/4 cup (1/2 stick) unsalted butter, softened at room temperature

1/2 tablespoon vanilla

1/8 teaspoon salt

2 cups confectioners sugar*

Using the whisk attachment to an electric mixer, beat cream cheese and butter on high speed until light and creamy

Add vanilla and salt and mix well

Add sugar, 1/2 of a cup at a time until at desired consistency(*2 cups was the perfect amount for me, but if you want a thicker texture and sweeter icing, you may want to add another 1/2 cup)

Once cake has cooled, evenly spread icing over top

Serve immediately or store in refrigerator up to a few days (best served within first 24 hours)

Adapted from Cooking Light

[/print_this]

Lighter Carrot Sheet Cake with Cream Cheese Icing 21

What do you refuse to put into your desserts?  Raisins and coconut are high on my list.

Disclaimer:  I received a free sample of Weight Watchers cream cheese, however all of the opinions in this post are my own.

[pinit]

Mint Chocolate Chip Meringues

Mint Chocolate Chip Meringues 2

Sometimes you need a light and refreshing cookie to balance out desserts like this.  As the cooler weather is moving in, the comfort of indulgent cookies, cakes and pies is more and more appealing.  However, I’m determined not to gain weight as we get through the winter.  In fact, I’d like to get rid of the couple of pounds that have snuck up on me over the last several months.

But don’t expect things to get all diet-y around here.  I really believe in balance and balance includes indulging in real butter-filled desserts in moderation.  But usually sometimes, one cookie or one slice of cake just doesn’t do it.  It is a time like that when something a little lighter is best.  That way you can have 10 4 cookies instead of 2.

Mint Chocolate Chip Meringues 6

I find that meringue cookies are a little underrated.  It used to be a nice treat when we would come home to a fresh batch of chocolate chip meringue cookies waiting in the kitchen.  The light and crispy exterior complimented by a chewiness just in the center makes for a nice change of pace.  Adding in the mini chocolate chips is a bonus.

While my mom always went with the classic meringue, I decided to change things up with a mint chocolate chip version.  Just a little bit of crème de menthe adds a nice flavor touch to the cookies.

Mint Chocolate Chip Meringues 15

The thing that made baking these cookies a little more fun than usual was a new toy in the kitchen.  OXO sent me some kitchen supplies including this OXO Egg Beater.  It is so much easier than trying to beat the eggs by hand but you get to feel more active than using an electric mixer.  Plus, it is great for making a small batch when a regular electric mixer can’t reach the bottom of the bowl.  I even used the egg beater when making breakfast today.  The fact that it is dishwasher-safe makes it an every day tool!

[print_this]

Mint Chocolate Chip Meringues

Yield: Makes 28 meringues

Ingredients

  • 2 egg whites at room temperature (not from the carton)
  • 1/2 teaspoon cream of tartar
  • 3/4 cup granulated sugar
  • 1 teaspoon creme de menthe
  • 2/3 cup semi-sweet mini chocolate chips

Cooking Directions

  1. Pre-heat oven to 350 degrees
  2. Line two baking sheets with parchment paper and set aside
  3. In a large bowl, beat egg whites with OXO egg beater using high speed (or an electric mixer with the whisk attachment) until lightly foamy
  4. Add cream of tartar and continue to beat until mixture is very foamy
  5. Add in half granulated sugar and beat until mixture is a creamy white
  6. Add crème de menthe and remaining sugar
  7. Beat at high speed until meringue has formed a thick better that is a glossy white and stiff peaks form from beaters or whisk
  8. Lightly fold in chocolate chips
  9. Use a teaspoon to drop spoonfuls of meringue on to baking sheets
  10. Place baking sheets in center of oven and turn oven off; leave meringues in oven for two hours or until firm and crisp

Adapted from Emeril [/print_this]

Mint Chocolate Chip Meringues 9

Disclaimer:  I received the OXO Egg Beater and other kitchen accessories as a part of the Foodbuzz Tastemaker program.  All of the opinions expressed in this post are my own.

Any tips on eating desserts in moderation? I would love to learn how to do that!

Strawberry Banana Bread and Childhood Friends

strawberry banana bread 25

Another summer weekend has come and gone and I feel like time is really flying.  I spent this past weekend in Philly for a bachelorette party and bridal shower for one of my best friends since fourth grade.  One of my favorite things about weddings is the series of events where you get to be with a group of friends who wouldn’t normally be in one place.  Seeing a half dozen girls that I’ve known since elementary school and catching up on life was so nice.  The most amazing part is that we can all do such different things with our lives but still come back to the same place and connect.  The group of girls (or women I guess I should say now!) included a lawyer, a doctor, two teachers, a marketing coordinator and an assignment editor at a local news station.  We live in different cities along the east coast and are a range of single, engaged and married but still we have that same place in our hearts for where we grew up.

strawberry banana bread 16

This Strawberry Banana Bread is a post for the Secret Recipe Club.  If you haven’t heard about it before, the Secret Recipe Club is a community of bloggers that, once a month, picks a recipe from a selected blog to make and share on his or her blog.  It is a great way to find new blogs to read and see what different types of things people are making.  For this month, I was able to choose a recipe from Katherine Martinelli.  She has a wonderful blog with a ton of delicious looking recipes.  There are a lot of savory dishes I want to try, but for Keep It Sweet, I obviously went with a baked good.

strawberry banana bread 29

Thanks to several overripe bananas, I chose to make Katherine’s Banana-Walnut Bread.  The changes I made were to replace the butter with fat free plain greek yogurt, reduce the sugar to 1/2 cup, use all whole wheat flour, skip the walnuts and add about a cup of chopped strawberries as she suggested.  The bread was moist and flavorful.  It was a great way to use up some produce on the end of its life!  Check out Katherine’s blog and go here for the original recipe.

strawberry banana bread 12

Do you keep in touch with any childhood friends? How often do you see them?


Healthy Muffins and a DSLR

These cute little banana corn muffins are low fat, easy to make,  and the perfect healthy breakfast treat.

Healthy Banana Corn Muffin Bites

Earlier this week I had an agenda:

1.  Start experimenting with my NEW camera (!!!)

2.  Bake something healthy enough to eat on a daily basis

3.  Use up the extremely brown bananas on my counter

Based on the above list, I decided to make Banana Corn Muffin Bites.

1.  New camera experimenting, check

2.  Low fat whole grain baked good, check*

3.  Brown bananas in muffin form, check

Healthy Banana Corn Muffin Bites

These mini muffins are moist and grainy with a wonderful sweetness from the ripe bananas.   I snacked on them alone, topped with peanut butter (obviously) and mixed into ice cream.  Matt cut his in half and topped them with jelly.

The best part?  Muffins like these are easy to make and don’t require a mixer.  Plus, mini muffins bake so quickly that it shouldn’t take you an hour from start to finish.

*Don’t worry, I’ll be back with something decadent and extra delicious shortly.

Start by combining the dry ingredients in a medium bowl and set aside

dry ingredients

In a large bowl, whisk together all remaining ingredients except for sliced banana

wet ingredients wet ingredients mixed

Whisk the dry ingredients into wet until just combined

adding dry ingredients ingredients mixed

Spoon batter into prepared mini-muffin pan; top each muffin with a slice of banana

Healthy Banana Corn Muffin Bites

Bake for 12-14 minutes or until a toothpick or knife comes out clean

Healthy Banana Corn Muffin Bites

[print_this]

Banana Corn Muffin Bites

Yield: Makes 24 mini muffins

Ingredients

  • 1 cup corn meal
  • 1 cup whole wheat flour
  • 1/4 cup granulated sugar
  • 2 teaspoons baking powder
  • 2 tablespoons cinnamon
  • 1/2 teaspoon salt
  • 1 egg, beaten
  • 1/4 cup unsweetened applesauce
  • 1 cup mashed ripe banana (~2 large bananas)
  • 3/4 cup skim milk (or any light milk of choice)
  • 1 teaspoon vanilla
  • 1/2 large banana, sliced

Cooking Directions

  1. Pre-heat oven to 400 degrees
  2. Spray a mini muffin pan with cooking spray or fill with cupcake liners
  3. Combine dry ingredients in a medium bowl and set aside
  4. Whisk all remaining ingredients, excluding sliced banana, in a large bowl
  5. Whisk dry ingredients into wet ingredients just until combined
  6. Spoon batter into prepared muffin tin
  7. Top each muffin with a slice of banana
  8. Bake for 12-14 minutes or until a toothpick or knife comes out clean

Adapted from All Recipes

 [/print_this]

[Note: I recommend serving these soon after baking because the bananas on top brown by the next day.  They are still edible but not all that pretty for company]

Healthy Banana Corn Muffin Bites

On another note, Mila at Lofty Appetite has some great tips for beginner DSLR usersWhat is the most useful photography tip you use?

Light-as-Air Banana Cheesecake

Light-as-Air Banana Cheesecake (low fat and gluten-free)

When I saw these sitting on my counter the yesterday, I knew something needed to be done.

P1040544

You know how I feel about wasting precious ingredients.

Light-as-Air Banana Cheesecake (low fat and gluten-free)

Since I had plans last night to go to a Passover dinner at my sister’s, I wanted to make something that would be kosher-friendly.  Then I realized cheesecake is almost entirely flour-free.  The only real issue is the typical cookie crust.

Light-as-Air Banana Cheesecake (low fat and gluten-free)

My mom made a non-fat banana cheesecake a few years ago that was really delicious.  I remember being so impressed by the creaminess despite using fat-free cream cheese.  This time around, I used light cream cheese for half to prevent the cheesecake from being too dense.

Light-as-Air Banana Cheesecake (low fat and gluten-free)

Instead of using graham crackers, I made an almond crust.  So not only is this cheesecake Passover friendly, but it is also gluten-free.

Start by making your crust; grind almonds in a food processor until nuts are in very small pieces with some crumbs

almonds in food processor 1

almonds in food processor 2

Mix almonds with granulated sugar and then add melted butter

almonds and sugar add butter to crust ingredients

When crust ingredients are combined, press them down in a spring-form pan sprayed with cooking spray and wrapped tightly with tin foil

making crust 1 making crust 2

Bake crust for ~7 minutes or until nuts are lightly browned

making crust 3

While crust is cooling, make cheesecake batter; beat cream cheese at high speed with the mixer whisk attachment for several minutes or until it is light and creamy

cream cheese 1 cream cheese 2

Add non-fat greek yogurt and mix well

greek yogurt

Mix in the banana, sugar and vanilla at medium-high speed

mashed bananas banana sugar vanilla mixed in

Then, add your eggs, one at a time, mixing at medium speed

add eggs

When batter is creamy and all ingredients are combined, pour into prepared pan; place uncooked cheesecake in a roasting pan and fill the pan with water to ~1/3 the height of the cheesecake

cheesecake batter ready to bake 2

Bake in center of oven for about 1 hour and 20 minutes or until top is firm

done 1

Chill cheesecake in refrigerator for 12 hours or until set; when ready to serve, carefully use a knife to skim the edge of the cheesecake and separate from the pan

Light-as-Air Banana Cheesecake (low fat and gluten-free)[print_this]

Almond Crust

Ingredients

  • 3/4 cup whole almonds (if using unsalted, add a dash of salt to crust ingredients)
  • 2 tablespoons granulated sugar
  • 2 tablespoons unsalted butter, melted

Cooking Directions

  1. Pre-heat oven to 350 degrees
  2. Grind almonds in a food processor until nuts are in very small pieces with some fine crumbs
  3. Mix almonds with granulated sugar and salt (if needed); stir in melted butter
  4. When crust ingredients are combined, press them down in a 9-inch spring-form pan sprayed with cooking spray and wrapped tightly with tin foil
  5. Bake crust for ~7 minutes or until nuts are lightly browned

Low Fat Banana Cheesecake

Ingredients

  • 2 8-ounce blocks fat free cream cheese, softened at room temperature
  • 2 8-ounce blocks light cream cheese, softened at room temperature
  • 1 cup fat free greek yogurt, plain
  • 1 1/2 cups sugar
  • 1 1/2 cups mashed ripe bananas (~3 medium)
  • 2 teaspoons vanilla extract
  • 4 large eggs

Cooking Directions

  1. Reduce oven temperature to 325 degrees once crust is finished baking
  2. While crust is cooling, make cheesecake batter; beat cream cheese at high speed with the mixer whisk attachment for several minutes or until it is light and creamy
  3. Add non-fat greek yogurt and mix well
  4. Mix in the banana, sugar and vanilla at medium-high speed
  5. Then, add your eggs, one at a time, mixing at medium speed
  6. When batter is creamy and all ingredients are combined, pour into prepared pan; place uncooked cheesecake in a roasting pan and fill the pan with water to ~1/3 the height of the cheesecake
  7. Bake in center of oven for about 1 hour and 20 minutes or until top is firm
  8. Chill cheesecake in refrigerator for 12 hours or until set; when ready to serve, carefully use a knife to skim the edge of the cheesecake and separate from the pan
  9. Serve topped with mixed berry sauce (recipe coming) or fresh whipped cream

[/print_this]

Adapted from Cooking Light

Light-as-Air Banana Cheesecake (low fat and gluten-free)

What is your favorite light dessert?

Accidentally Scuffins

Sometimes recipe experiments don’t work out.  Sometimes they work, just a little differently than you expect.

Cinnamon Apple Chunk Scuffins

I set out to make scones, but I ended up with scuffins!  A scuffin is basically the hybrid of a scone and a muffin.  These Cinnamon Apple Chunk Scuffins are hearty, chewy, and flavorful.  Like scones, they aren’t too sweet, but like muffins, they are nice and moist.  Even better than both, they are low in fat and added sugars.

Cinnamon Apple Chunk Scuffins

I got my inspiration from a bakery in Philadelphia.  Every time I am in the area, I buy a few of their delicious scones.  They supposedly are low in fat, high in fiber, etc., but they are also the size of my head.  My strategy is to buy a few different flavors and eat pieces of each one.  That way I never eat an entire scone, right?

Cinnamon Apple Chunk Scuffins

My favorite flavors are the apple and cinnamon varieties, so I decided to make my baked good a combination of the two.  These scuffins are full of delicious cinnamon chips and big apple chunksI hate when you get an apple dessert and can barely find the apple pieces! They are also made with whole grains.  I’m telling you, these are healthy!

They taste wonderful right out of the oven, but also taste good at room temperature.  I ate them alone or crumbled over greek yogurt with fruit and peanut butter.  You can also store them in the freezer and defrost for a healthy last minute snack.

apples 1

A note on the cinnamon chips: I was lucky enough to win a bag of cinnamon chips from Amy at Very Culinary, but you can check the Hershey’s website to see where they are sold near you.

cinnamon chips 1

The recipe was loosely adapted from Cooking Light

Whisk together flours and oatmeal in a large bowl

flours and oats 1

Add the remaining dry ingredients (through cinnamon) and whisk; set aside

dry ingredients 1

Combine the wet ingredients and whisk together until combined

wet ingredients 1 wet ingredients 2

Stir wet ingredients into dry

dough 1

Add the chopped apple and cinnamon chips; knead them in with your handsadd apple cinnamon chips

Shape dough into two round disks and place on a baking sheet lined with parchment paper; use a pizza cutter or sharp knife to slice each round into 8 pieces; do not separate the dough

Cinnamon Apple Chunk Scuffins

Bake for 15-20 minutes or until scuffins are firm and lightly brownedCinnamon Apple Chunk Scuffins

[print_this]

Cinnamon Apple Chunk Scuffins

Loosely adapted from Cooking Light

Yield: 16 scuffins

Ingredients

  • 3/4 cup all-purpose flour
  • 2/3 cup whole wheat flour
  • 3/4 cup old-fashioned oatmeal
  • 1/4 cup light brown sugar
  • 2 tablespoons granulated sugar
  • 2 teaspoons baking powder
  • 1/2 teaspoon baking soda
  • Dash salt
  • 1 teaspoon cinnamon
  • 3/4 cup fat free greek yogurt
  • 2 tablespoons unsweetened applesauce
  • 1 large egg white
  • 1/2 teaspoon vanilla extract
  • 1 1/2 cup chopped apple (~1 large apple)
  • 1/3 cup cinnamon chips

Cooking Directions

  1. Pre-heat oven to 400 degrees
  2. Whisk together flours and oatmeal in a large bowl
  3. Add the remaining dry ingredients (through cinnamon) and whisk; set aside
  4. Combine the wet ingredients and whisk together until combined
  5. Stir wet ingredients into dry
  6. Add the chopped apple and cinnamon chips; knead them in with your hands
  7. Shape dough into two round disks and place on a baking sheet lined with parchment paper
  8. Use a pizza cutter or sharp knife to slice each round into 8 pieces; do not separate the dough
  9. Bake for 15-20 minutes or until scuffins are firm and lightly browned

[/print_this]

Cinnamon Apple Chunk Scuffins

Have you ever had a scuffin?

Ice Cream Inspiration

Did you know that Cold Stone sells ice cream cupcakes?  They do.  Did you know that ice cream is my ultimate portion control weakness?  It is.  If you put this in front of me and left me alone, it would be gone when you came back.

Black Bottom Ice Cream Cupcakes

Individual ice cream cupcakes, however, this is portion control I can live with.  Using Cold Stone as my inspiration, I created Black Bottom Ice Cream Cupcakes, a dessert that combines the sweet crunch of chocolate, creamy ice cream and and soft spongy cake!

Black Bottom Ice Cream Cupcakes

I used a white cake mix (gasp), made with applesauce and egg whites, fat free strawberry ice cream, and semi-sweet chocolate chips.  The combinations of flavors are endless and I can’t wait to make different versions of these cupcakes.  They would be a perfect dessert for a child’s birthday party or for an adult like me who has no control around ice cream.

There are a few components to this recipe, but are really easy to make.

Start by making the “cake” of the cupcake; use a cookie dough scoop (about 2 tablespoons) to place batter into cupcake tins

batter in muffin tin 2

The cupcakes are small so they will bake quickly, 8-10 minutes

cupcakes baked

While cupcakes are cooling, melt chocolate and coat the bottom of separate cupcake baking cups (1-2 tablespoons of chocolate each); freeze for about 10 minutes or until chocolate is hard

chocolate in cups

Meanwhile, remove ice cream from freezer to soften

strawberry ice cream

When chocolate has hardened, scoop about a quarter of a cup of ice cream into each cup

ice cream in cups

Place cakes on top of ice cream and push down to secure

cake in cups

Cover with saran wrap and freeze cupcakes for at least one hour

Carefully unwrap frozen cupcake

cupcake 1

Black Bottom Ice Cream Cupcakes

Top with whipped cream

Black Bottom Ice Cream Cupcakes

And jimmies (yes, that’s what I call them)

Black Bottom Ice Cream Cupcakes

[print_this]

Black Bottom Ice Cream Cupcakes

Ingredients:

1 Prepared white cake batter from 1 box mix
3 cups semi-sweet chocolate chips
1/2 gallon strawberry ice cream

Directions:

Pre-heat oven as directed on cake mix box
Prepare cake batter
Use a cookie dough scoop (about 2 tablespoons) to place batter into cupcake tins filled with paper cup holders or sprayed with cooking spray
Bake cake 8-10 minutes or until a knife comes out clean
While cupcakes are cooling, melt chocolate in the microwave or on the stove
Coat the bottom of separate cupcake baking cups with melted chocolate (about 1-2 tablespoons of chocolate each)
Freeze for about 10 minutes or until chocolate is hard
While chocolate is chilling, remove ice cream from freezer to soften
When chocolate has hardened, scoop about a quarter of a cup of ice cream into each cup
Place cakes on top of ice cream and push down to secure cupcakes
Cover cupcakes with saran wrap and freeze for at least one hour
Serve topped with whipped cream and jimmies

Notes:

If your freezer is not very cold, make sure to serve immediately or cupcakes will melt

You can control the ingredients and make them as light or as decadent as you’d like

[/print_this]

Black Bottom Ice Cream Cupcakes

What is your favorite way to eat ice cream?

Boston and a Chocolate Cupcake

Last weekend, the Husband and I went to Boston for a short trip to visit our foodie friends/newlyweds, Jon and Ali.  Given that they love food as much as we do, most of the weekend’s itinerary revolved around eating!  We had brunch at The Friendly Toast, tasted beers at Harpoon Brewery, dinner at B&G Oysters,  and another brunch at Buttery.  Our friends treated us well!  Last but not least, we were able to pick up lunch for the bus ride home at Flour.

I’ve been hearing about Flour throughout the blog world forever.  The bakery was made famous nationally by the wonderful pastry chef, Joanne Chang(Sidenote: I didn’t know until just now that Joanne was an Applied/Math and Econ major at Harvard.  Incredible!) Anyway, I’m so glad we got a chance to check it out.  Matt picked up a sandwich and jelly-filled donut that looked delicious.  You could see the high quality of jelly when he bit into it.  I got a salad that was really only a way for me to justify dessert;-) Easy Low Fat Vegan Chocolate Cupcakes

There were so many delicious looking desserts to choose from, especially the cookies and brownies.  However, when I spotted the giant Low Fat Vegan Chocolate Cupcake, I was really curious.  I was no longer on my Vegan Challenge, but I figured if they were selling a vegan cupcake, it had to be good.  The cupcake wasn’t good.  It was delicious.  It was moist and chocolaty and it was all I could do not devour it in 3 seconds flat.  I’m not saying it was good for a vegan cupcake, it was good for any cupcake.  Moist chocolate cupcakes are hard to come by and this one had me at first bite.

Okay, so in my excitement over the cupcake, I forgot to take a picture.  Luckily, I had fallen so in love with it that I immediately went on a hunt to find the recipe.  Much to my delight it exists here.  As soon as I got a chance to pick up all of the necessary ingredients, the cupcakes were in the oven.  That is barely an exaggeration because this is one of the easiest recipes I’ve made in a while!  No fancy equipment needed.

key ingredients

I was excited for my first time using the VALRHONA cocoa my parents brought back from Belgium.   The good quality cocoa powder has a richness to it that you can’t get from your average cocoa.  Additionally, I picked up molasses, which I’ve actually never used before.  It smelled a little funny (I expected a syrup aroma) but it seemed to work out okay! Espresso powder is also often used in chocolate baked goods to add a richness to the flavor.  I picked up some of that as well.

To get started, pre-heat your oven to 350 degrees and line 18 regular sized muffin tins with cupcake liners.  How cute are these Valentine’s Day liners?

cupcake holders

Whisk together your dry ingredients: flour, granulated sugar, cocoa, espresso powder, baking soda and salt

dry ingred 1

Add the chocolate chips and whisk them into the mixture

dry ingred 2

Set aside

dry ingred 3

Whisk together all wet ingredients: water, oil, molasses, and vanilla

wet ingred 1

The mix will look a little like balsamic vinaigrette, don’t be alarmed

wet ingred 2

Then stir the wet ingredients into the dry, do not overmix

scooping batter

Use an ice cream scoop to fill cupcake liners about halfway (about 1/3 cup of batter per cup)

batter in cups

Bake cupcakes for 8-12 minutes or until a knife comes out clean; allow to cool on a cooling rack

Easy Low Fat Vegan Chocolate Cupcakes

Sprinkle with confectioners’ sugar before serving

Easy Low Fat Vegan Chocolate Cupcakes

[print_this]

Low Fat Vegan Chocolate Cupcakes

Recipe from V02, created by Joanne Chang

Ingredients:

1 1/2 cups all-purpose flour

1/2 cup granulated sugar

1/3 cup cocoa powder (I used about a tablespoon less since the VALRHONA is so rich)

2 teaspoons instant espresso powder (finely ground espresso beans)

1 teaspoon baking soda

1/4 teaspoon salt

3/4 cup semisweet chocolate chips (dairy-free for vegan)

1 cup cold water

1/4 cup oil canola

2 tablespoons molasses

1 teaspoon vanilla extract

Confectioners’ sugar (optional)

Directions:

Pre-heat oven to 350 degrees and line 18 regular sized muffin tins with cupcake liners

Whisk together dry ingredients: flour, granulated sugar, cocoa, espresso powder, baking soda and salt

Add the chocolate chips and whisk them into the mixture; set aside

Whisk together all wet ingredients: water, oil, molasses, and vanilla

Stir the wet ingredients into the dry, do not overmix

Use an ice cream scoop to fill cupcake liners about halfway (about 1/3 cup of batter per cup)

Bake cupcakes for 8-12 minutes or until a knife comes out clean (do not overbake); allow to cool on a cooling rack

Sprinkle with confectioners’ sugar before serving

Notes:

Do not leave out the chocolate chips, they add a lot in terms of texture and flavor

While these weren’t quite as delicious as the bakery’s cupcakes, they were still very tasty.  I overbaked mine probably by a minute or two (12 minutes total) and I think that made a big difference

[/print_this]

Each cupcake comes out to 4 Weight Watchers Points+

Easy Low Fat Vegan Chocolate Cupcakes

Have you eaten your way through a city lately?

Lighter Lemon Pound Cake

I used to have an aversion to lemon desserts.  Lemon meringue pie? No thank you.  Lemon bars?  Don’t tease me with that powdered sugar topping.  Lemon cake? Eh.  Truthfully, I have an initial reaction to any dessert lacking chocolate that involves a little bit of apprehension.  Even though I adore ice cream, plain vanilla will provokes the same reaction.  It better be REALLY good if there is no chocolate involved.  Warm fruit desserts and anything involving peanut butter generally passes the test, but it isn’t easy.

So when my in-laws raved about Del Frisco’s Lemon Cake a couple of years ago, I kind of smiled and nodded.  First of all, restaurant desserts in general are almost never as good as you think they will be.  And it is lemon cake!  Really, what would even be the point?  But through it all, I am a dessert lover and it wouldn’t be fair if I didn’t give the cake a chance.  So when I found myself with them at Del Frisco’s and everyone insisted on ordering Lemon Cake, I suggested we also order the chocolate banana bread pudding (um, yum!), but was willing to give this infamous dessert a try.  That was the Lemon Cake that turned me around.

Lighter Lemon Pound Cake

Don’t get me wrong, I still don’t like lemon meringue pie or lemon bars, but a rich moist cake with a very light lemon flavor is actually refreshing without being over the top.  So when the husband requested a lemon dessert last weekend, I willingly made my first ever Lemon Cake.

This is actually a simple Lemon Pound Cake that is very easy and comes out extremely moist and flavorful.  If I were to serve it at a dinner party, I’d make a glaze or top it with fresh whipped cream and berries.  Don’t worry, there would be some sort of chocolate alternative as well.

To begin, whisk your dry ingredients (flour, baking powder and salt), and set aside

whisking dry ingred

In a large mixing bowl, beat together cream cheese and butter on high speed for several minutes until mixture is light and creamy

creamed butter and cream cheese

Use a microplane to lightly grate  the skin of a lemon

lemon and microplane

Be careful not to scrape too deep, the white of the skin is more bitter

lemon zest

On high speed, beat the lemon zest and greek yogurt into butter and cream cheese mixture for about a minute

adding lemon zest and yogurt

Add sugar and beat on high speed until batter is smooth and creamy

adding sugar

Now add the eggs, one at a time, putting the mixer on high for about a minute or two between each

adding eggs

Add in the vanilla on high speed for a minute; scrape the sides of the bowl and turn mixer on high again until well combined

adding vanilla

Reduce speed to low and gradually add in your dry ingredients

mixing in dry ingred

Before it is fully combined, remove bowl from mixer and lightly fold batter to get all of the dry ingredients mixed in; this will prevent overbeating and a cake with the density of a rock

folding in remaining dry

Pour batter into a 9×5 loaf pan

batter in pan

Bake for 45-50 minutes or until a knife comes out clean

Lighter Lemon Pound Cake

[print_this]

Lighter Lemon Pound Cake

Adapted from Joy the Baker

Serves 8

Ingredients:

2 cups all-purpose flour

1 teaspoon baking powder

1/2 teaspoon salt

1 8-ounce block of low fat cream cheese, softened at room temperature

1/2 cup (1 stick) of unsalted butter, softened

1/2 cup fat free plain greek yogurt

1 TB fresh lemon zest (about 1 lemon’s worth)

1 cup granulated sugar

4 eggs brought to room temperature

1 teaspoon vanilla extract

Directions:

Pre-heat oven to 350 degrees

Whisk dry ingredients (flour, baking powder and salt), and set aside

In a large mixing bowl, beat together cream cheese and butter on high speed for several minutes until mixture is light and creamy

Use a microplane to lightly grate  the skin of a lemon

On high speed, beat the lemon zest and greek yogurt into butter and cream cheese mixture for about a minute

Add sugar and beat on high speed until batter is smooth and creamy

Add the eggs, one at a time, putting the mixer on high for about a minute or two between each

Add in the vanilla on high speed for a minute; scrape the sides of the bowl and turn mixer on high again until well combined

Reduce speed to low and gradually add in dry ingredients

Before batter is fully combined, remove bowl from mixer and lightly fold batter to get all of the dry ingredients mixed in

Pour batter into a 9×5 loaf pan sprayed with non-stick cooking spray

Bake for 45-50 minutes or until a knife comes out clean

[/print_this]

Lighter Lemon Pound Cake

Sidenote:  We actually had our rehearsal dinner at Del Frisco’s!  No lemon cake for me that night, I was too excited to eat (and let me tell you, that never happens).

How do you feel about lemon desserts?

Delicious End to 2010

As I take a look at some of the last month’s activities I guess it shouldn’t be surprising that my pants don’t fit…

We had our 5th annual Thanksgiving with Friends

(the infamous dinner with 8 desserts)

hosts

Had and fulfilled intense cookie cravings

Tried to make the perfect cookie

Baked the Brown Eyed Baker’s Peanut Butter Oatmeal Chocolate Chip Cookies

oat pb choc cookies 2

Not pictured but worth mentioning, made Jessica’s Cookie Dough Dip in Chocolate Chip, Snickerdoodle and Chocolate Fudge

Went home to visit with family

The sister made chocolate covered pretzels

jess making pretzles 7

pretzels 3

Dad gave me photography lessons

dad with camera 2

Mom made a zillion cakes

(Outrageous Brownie with Peanut Butter Icing and Chocolate Ganache)

brownie 3

(Pumpkin Cake with White Chocolate Buttercream and Cinnamon Whipped Cream)

pumpkin cake 3

(The third cake was a Chocolate Cake with Vanilla and Chocolate Buttercream)

dessert table

Went home again for the 14th Annual Christmas Eve Brunch with my best friends from home

girls 2

It snowed, so I rushed to the train to beat the blizzard

snow 2

snow 1

And since it was snowing, I had to make a trifle

trifle 4

We celebrated New Year’s Eve

With Frozen Yogurt Pie

And Chocolate Dipped Peanut Butter Sandwiches

finished 1

This delicious food and the fun events with family and friends was definitely worth gaining a few pounds.  Better keep reminding myself as I fill up on vegetables over the next few weeks;-)

What memorable food did you eat this holiday season?

Ice Cream Pie with a New Year’s Eve Worthy Topping

A few months ago I received a few coupons for free Stonyfield’s ice cream or frozen yogurt.  I finally used the coupons just in time for their expiration date and was inspired to use my frozen yogurts to make a New Year’s Eve dessert.  I’ll leave a full review of the yogurt for a separate post, but I am very happy with the delicious dessert I came up with.

slice 1

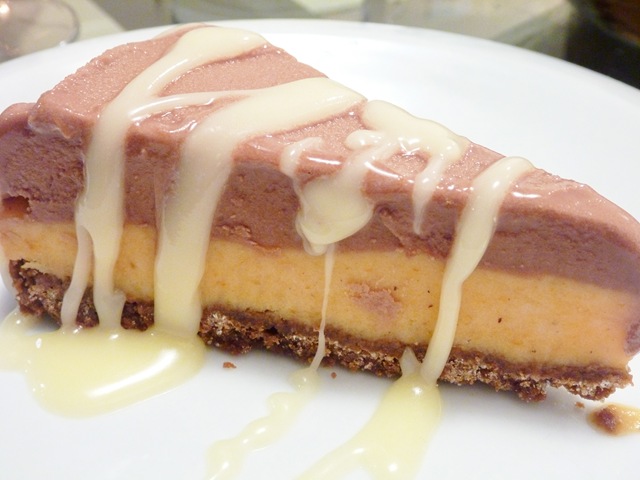
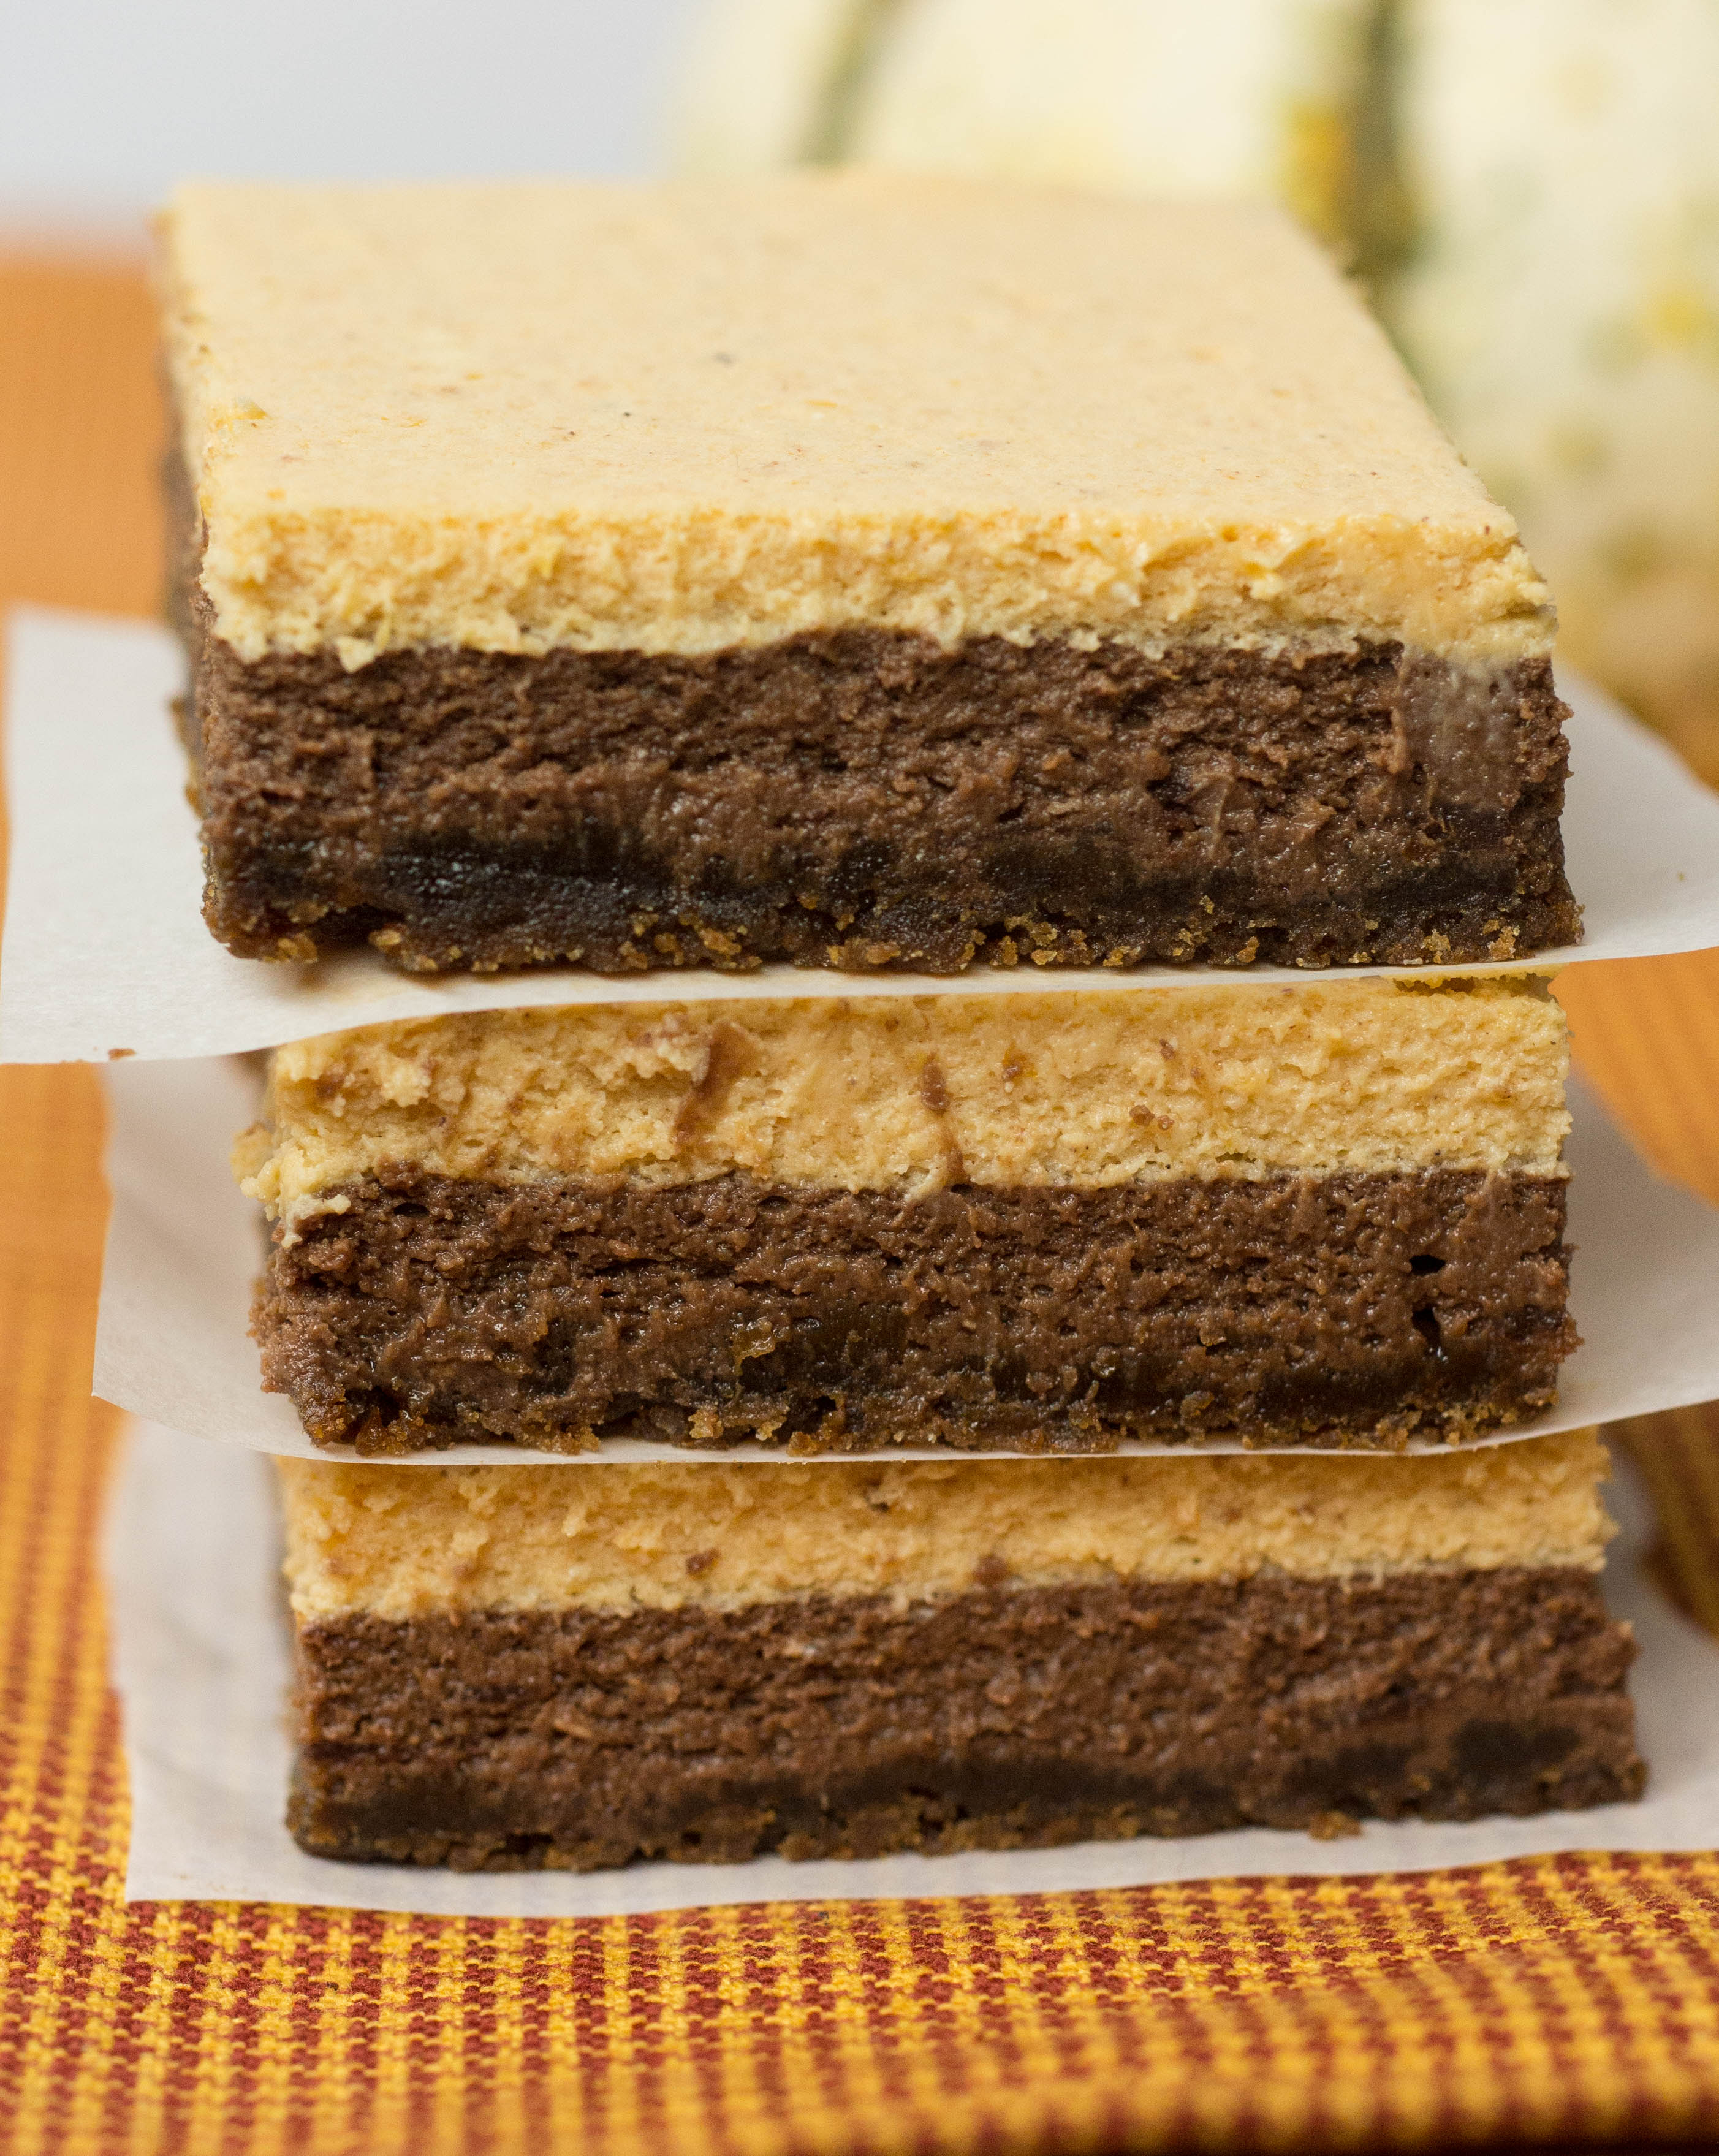
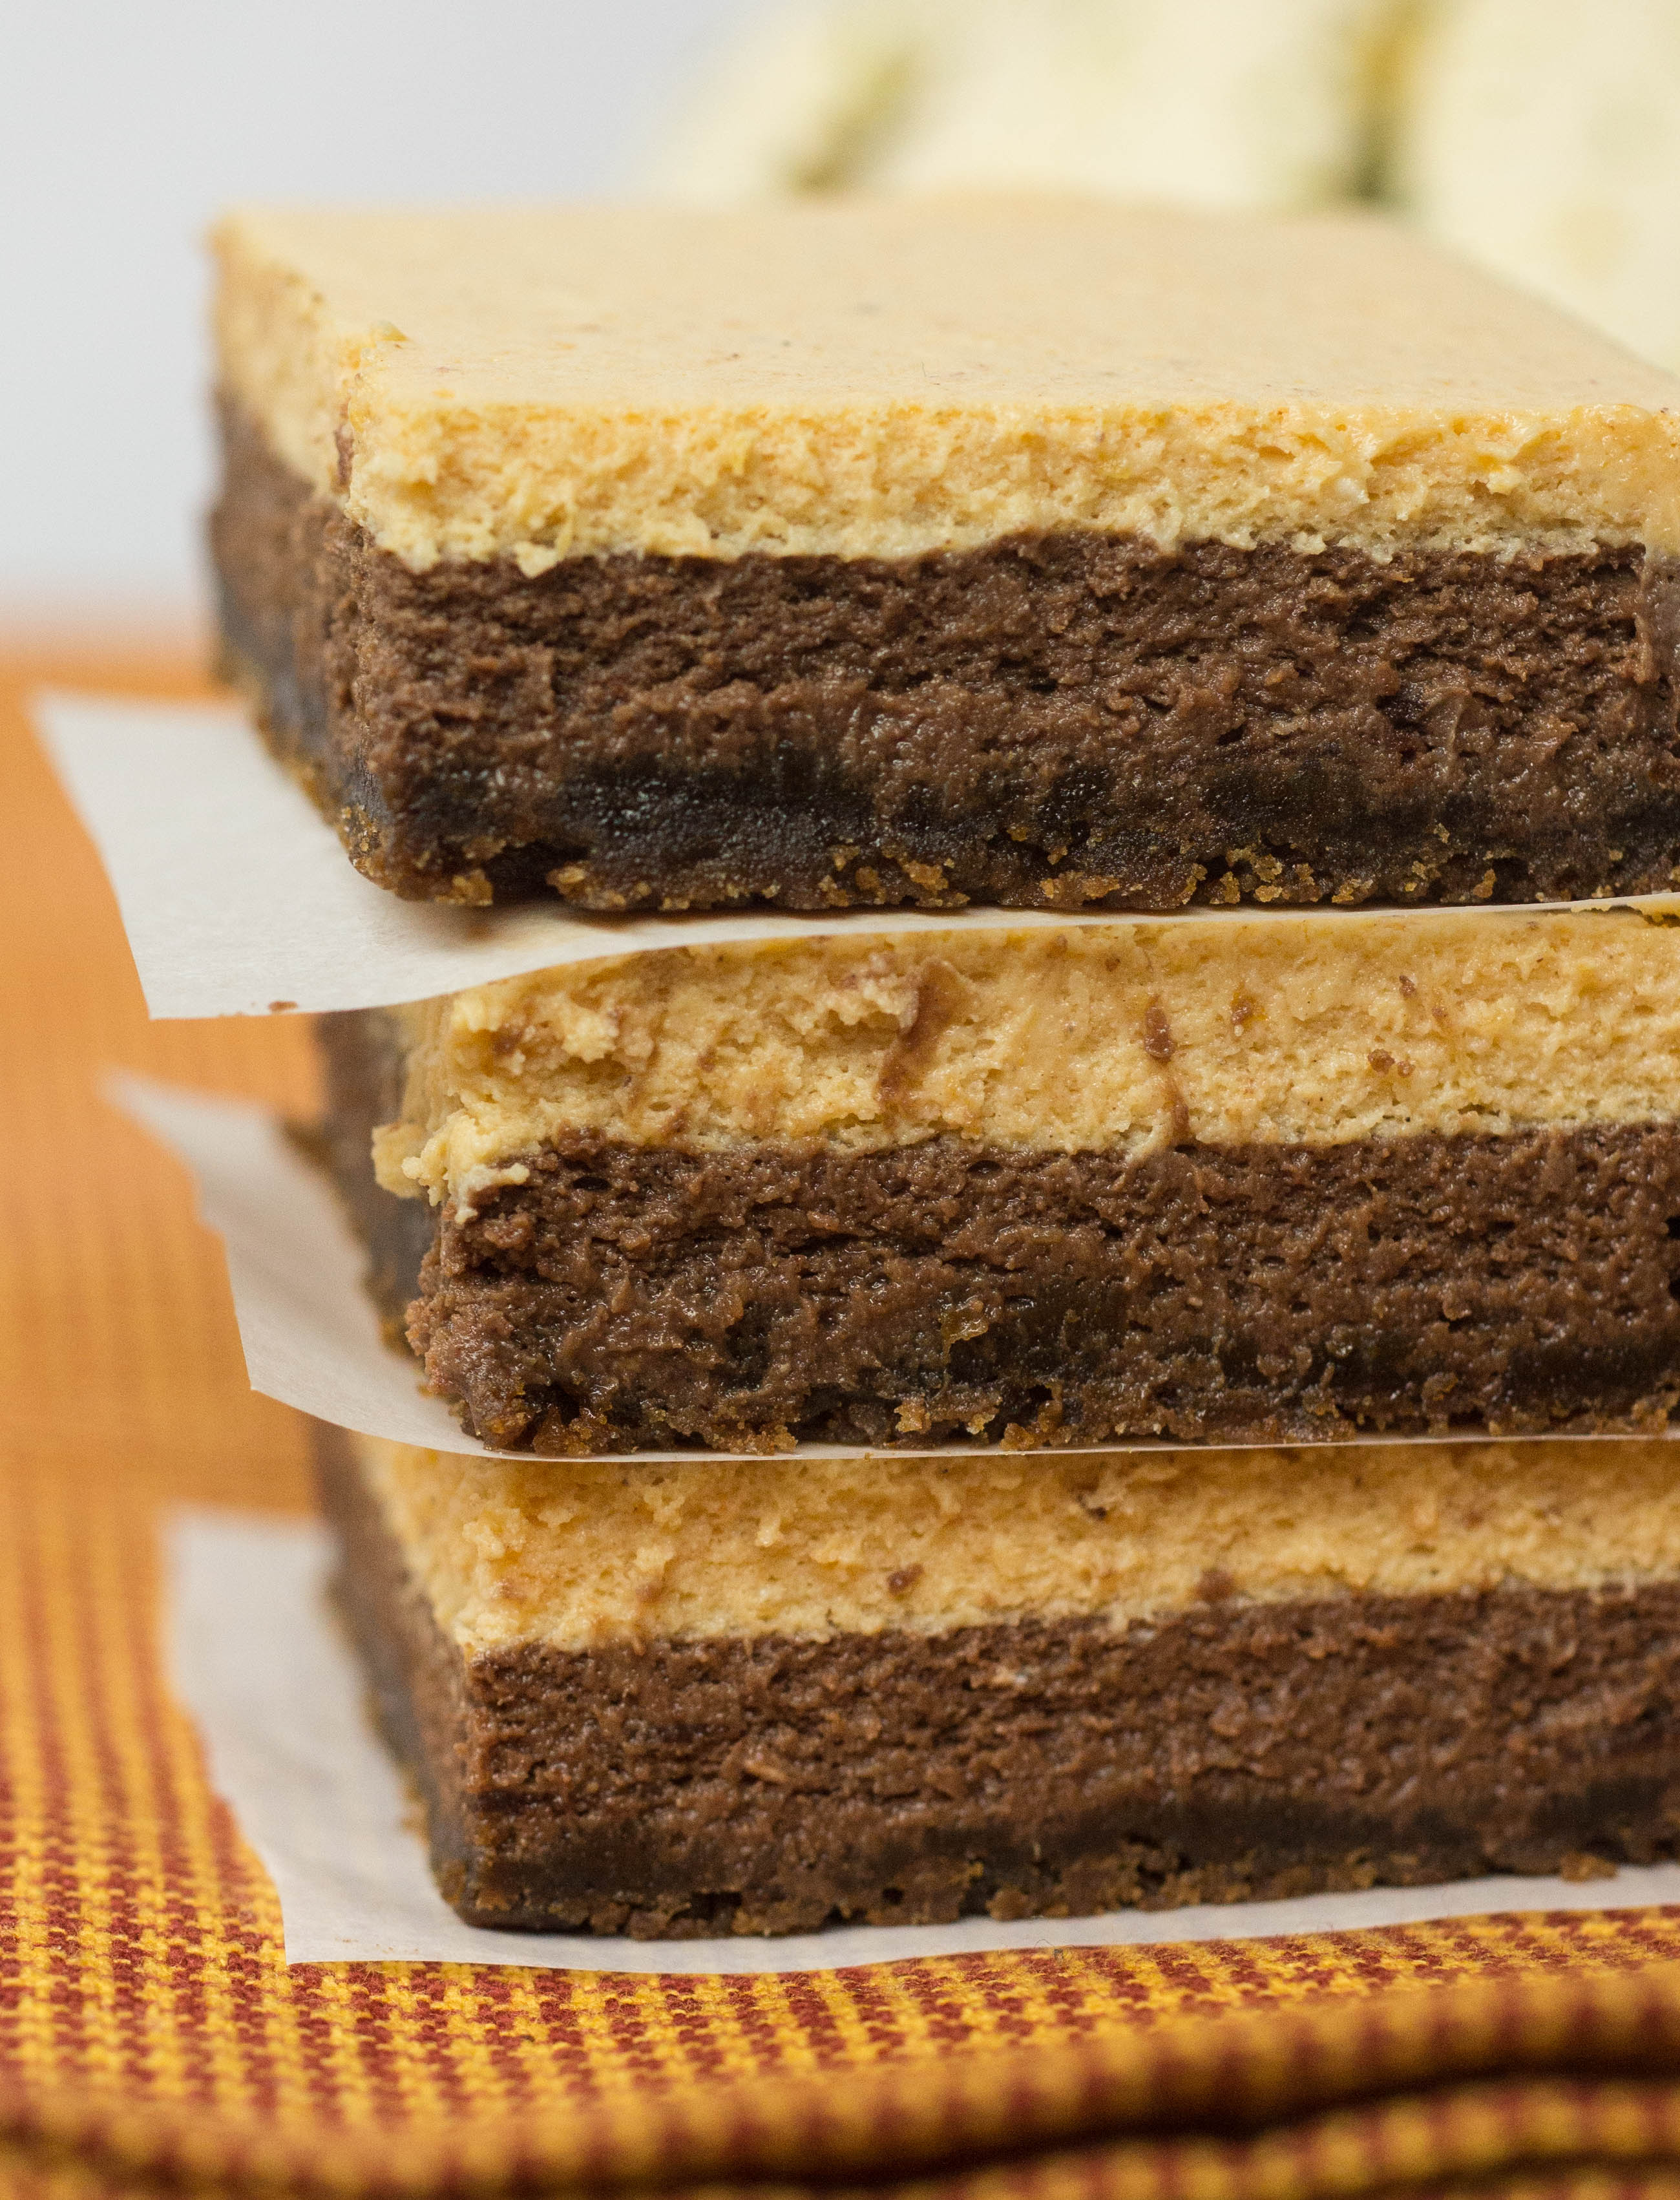
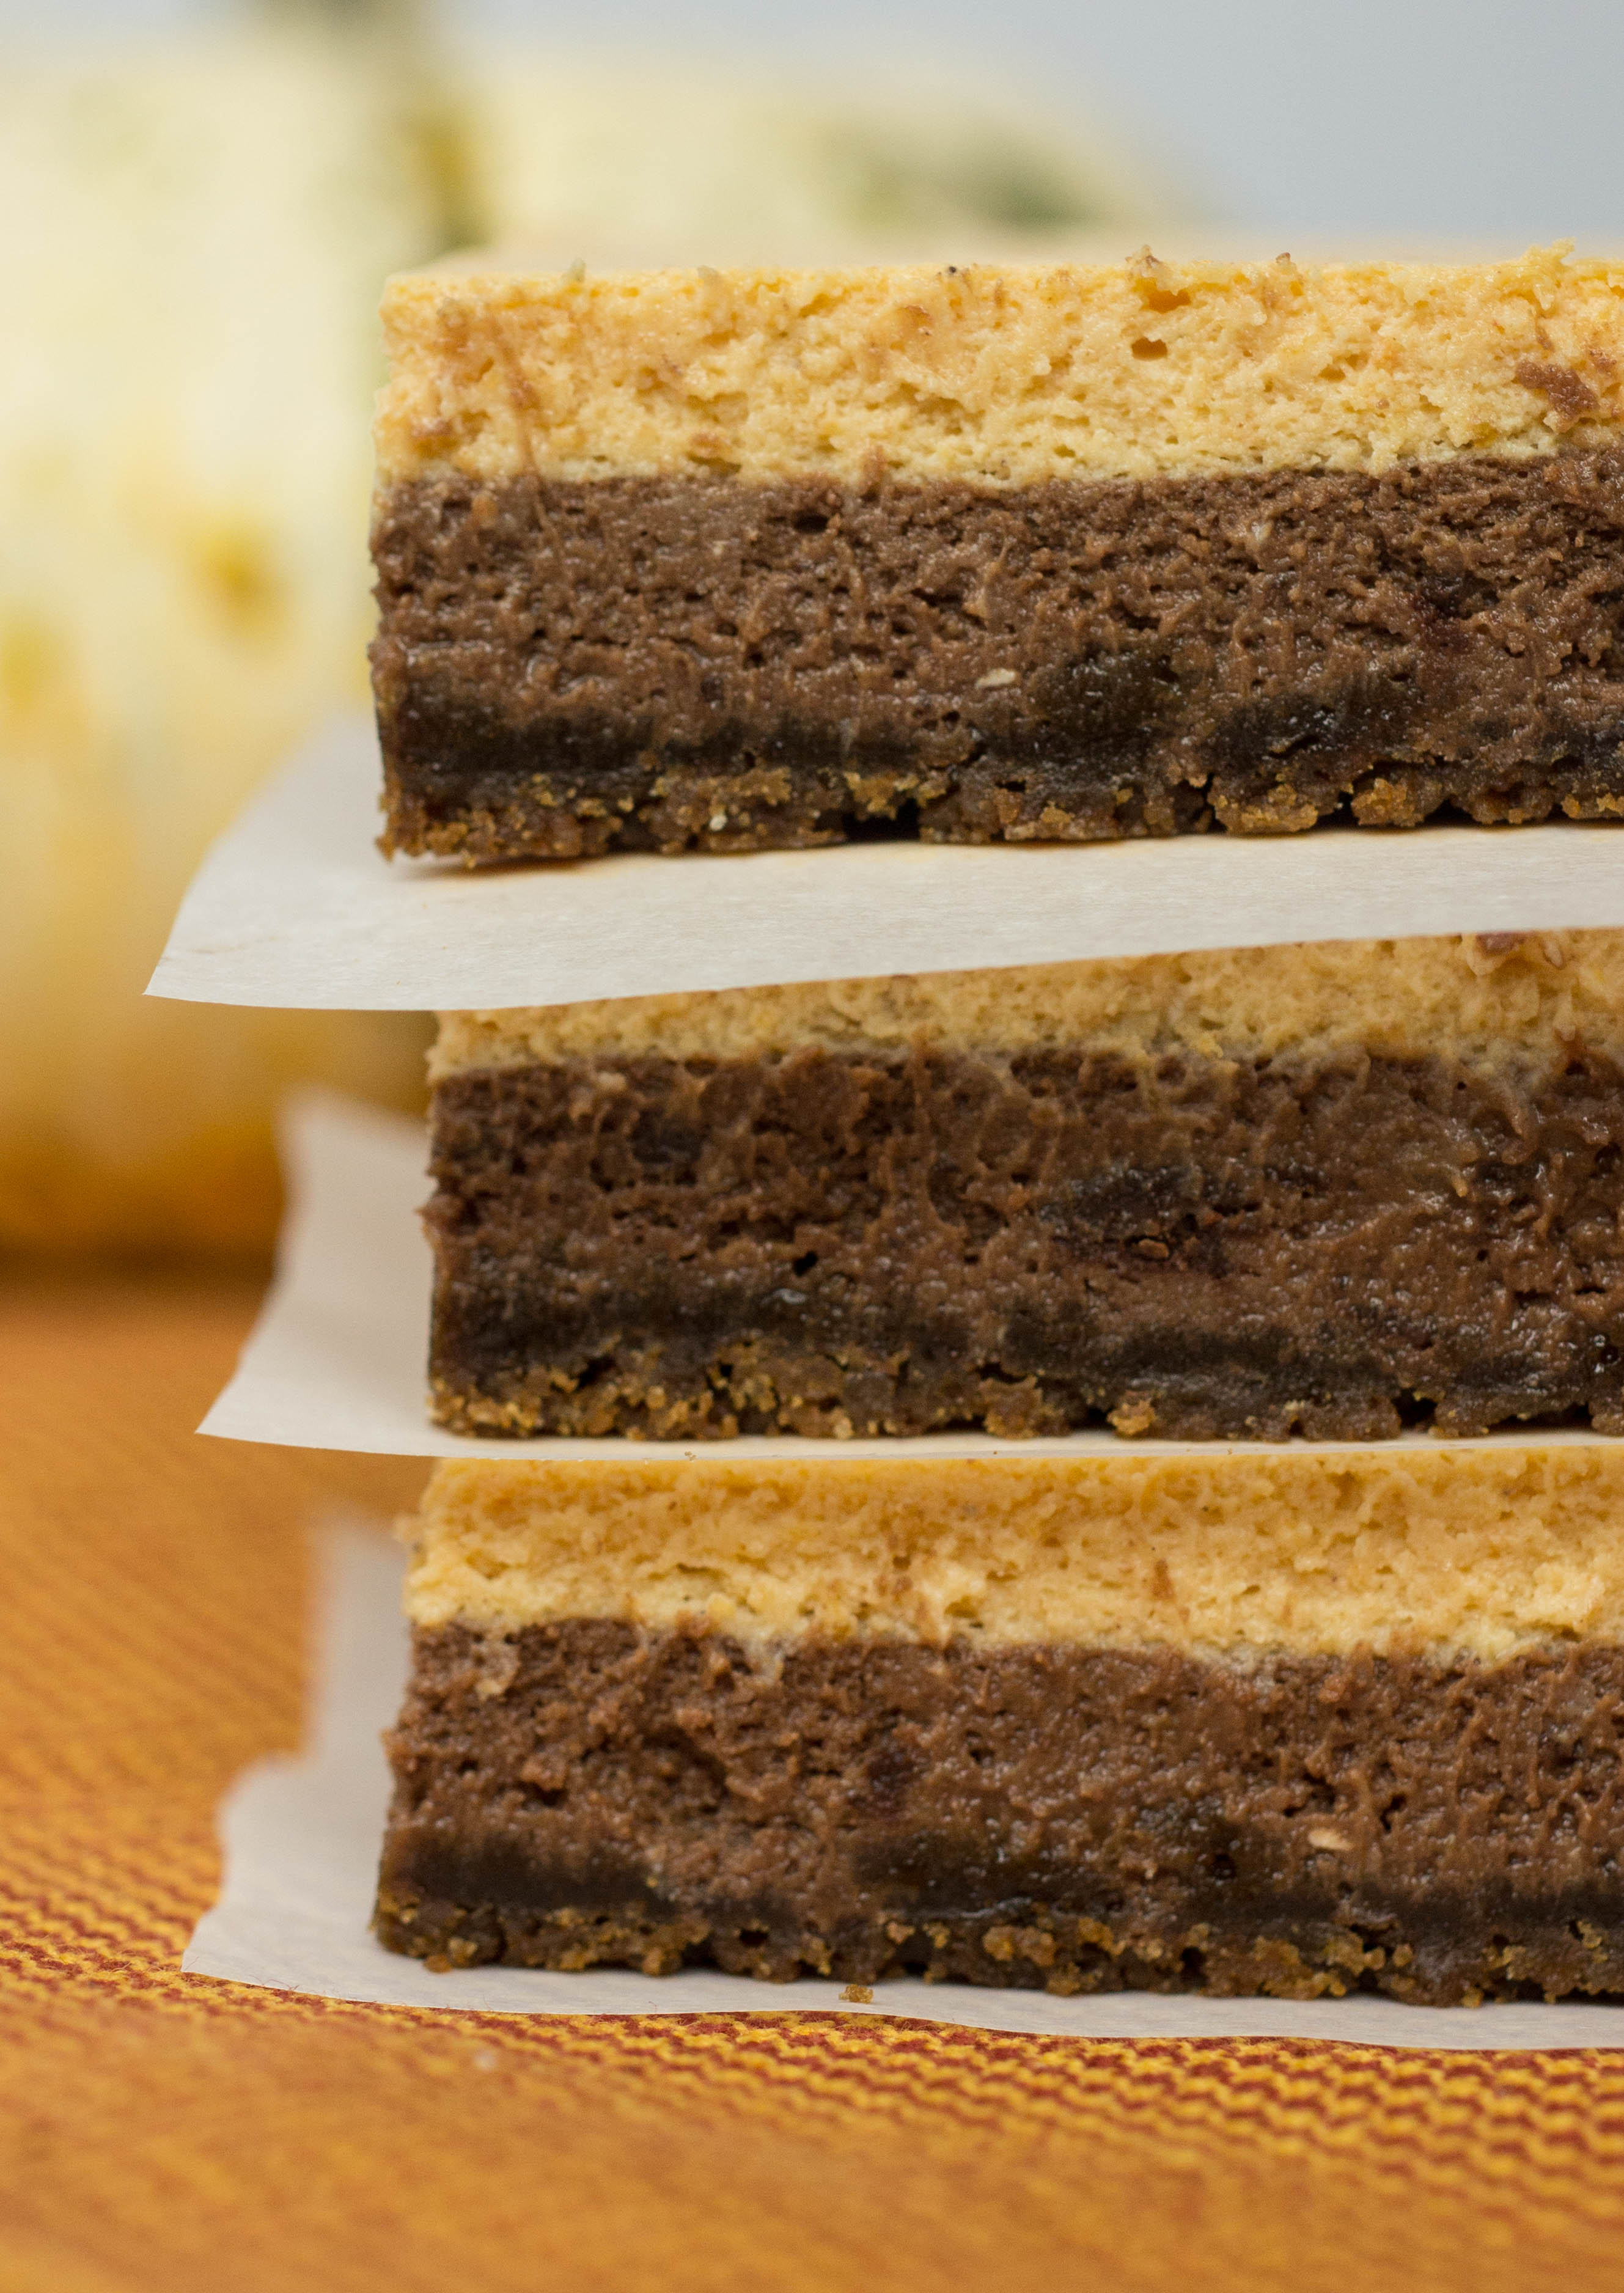
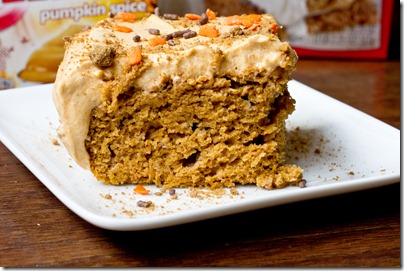
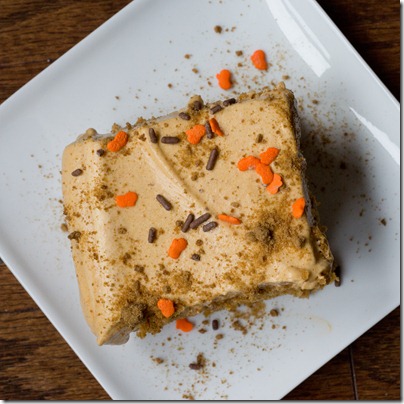
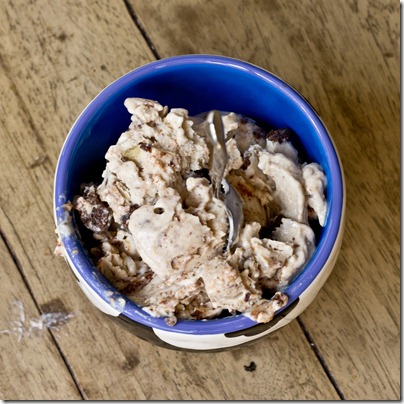
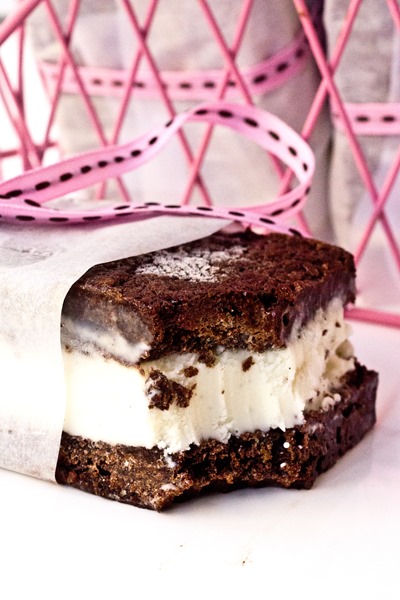
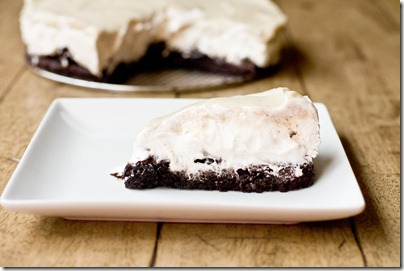
You are looking at layers of crunchy gingersnap crust, pumpkin frozen yogurt, and chocolate frozen yogurt topped with a salted caramel cream sauce.  I came up with the dessert because chocolate and pumpkin are some of my favorite flavors, but as soon as I created it I realized that this mimics my favorite cheesecake bar.  Ok, so it wasn’t the first time using these flavors, but I promise that it was worth the lack of creativity for an excuse to make the topping.  This Frozen Pumpkin and Chocolate Yogurt Pie with Salted Caramel Cream Sauce was a very worthy end to 2010.

slice 3

I love that the filling to this pie is fat free frozen yogurt, because it makes you think you are being really healthy. Never mind that the crust has half a stick of butter in it and the sauce is based on sugar, butter and heavy whipping cream.  Details, details.  Moderation is key, or so they say.

The pie is really easy to make.  The sauce is a little more challenging.  I simplified it after my first attempt where I ended up with rock-hard chunks of sugar and butter.  It took a lot of soaking to clean that pot!

bad caramel

First thing to do is run your gingersnap crumbs through a food processor

gingersnaps 1

Grind until the cookies are mostly fine crumbs

gingersnaps 2

Melt the butter

butter 1

And mix it with the cookie crumbs

crumbs with butter

Next, add sugar

adding sugar

When the crust is fully mixed, press it down into a 9-inch spring-form pan sprayed with non-stick cooking spray

crust in pan 2

Bake for about 8 minutes or until firm

crust baked

Allow the crust to cool and put the vanilla frozen yogurt in a medium bowlvanilla in bowl

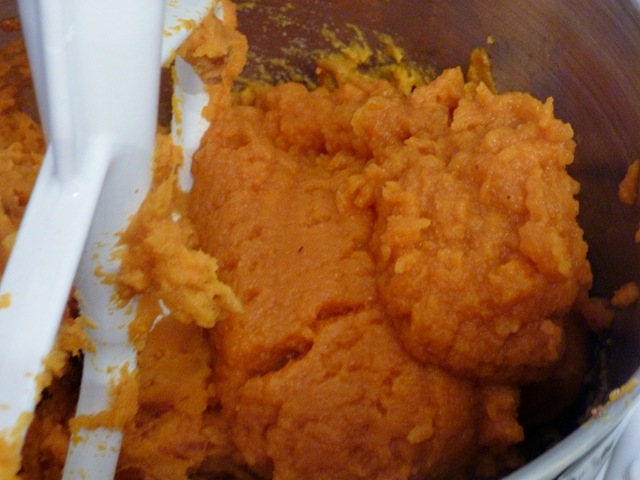
The vanilla is the base for your pumpkin layer

pumpkin ingredients

Fold in the pumpkin and pumpkin pie spice until well combined

vanilla with pumpkin

Spread pumpkin layer over crust and freeze for about 10 minutes

pumpkin layer frozen

Meanwhile, remove the chocolate frozen yogurt from the freezer so that it is softened

chocolate fro yo 2

Spread chocolate yogurt over the pumpkin and freeze covered with foil until ready to serve

chocolate layer

To make the caramel, begin by heating sugar over low to medium heat in a small sauce pan

sugar in pot

Add butter

add butter to pot

Stir butter and sugar until butter is melted and fully combined with sugar

melting butter and sugar

Reduce the heat to low and add cream

cream added

Stir continuously until mixture bubbles

sauce bubbling

Then remove pot from heat and stir in corn syrup

adding corn syrup

Add salt and stir

adding salt

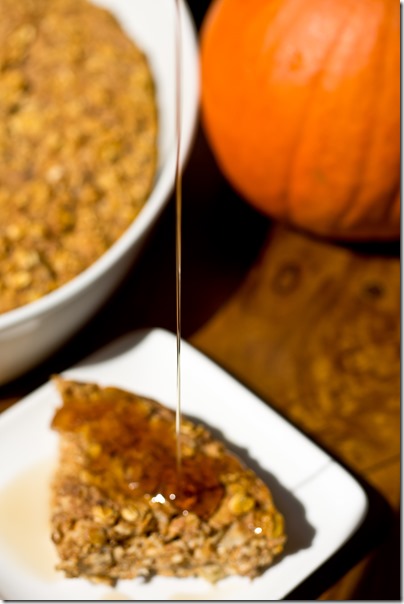
The sauce will be a thick liquid that hardens as it cools; store it in the refrigerator and microwave on a low setting to re-heat

sauce done

When it is time to serve the dessert, carefully remove outside of springform pan

whole ice cream pie

Cut slices and drizzle with caramel cream sauce

slice 2

When no one is looking, steal some extra sauce for cookies, fruit, your finger…

[print_this]

Frozen Pumpkin and Chocolate Yogurt Pie with Salted Caramel Cream Sauce

Sauce adapted from the Serendipity Sundaes cookbook

Serves 8-12

Pie Ingredients:

1 1/4 cups of gingersnap cookie crumbs (about 25 cookies)

2 tablespoons granulated sugar

4 tablespoons (1/2 stick) unsalted butter

2 cups vanilla frozen yogurt (I used Stonyfield fat free vanilla)

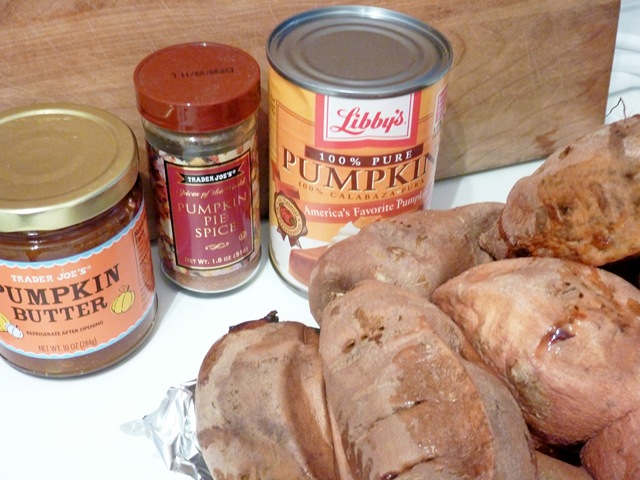
1/2 cup canned pumpkin (not pumpkin pie filling)

1/2 teaspoon pumpkin pie seasoning

2 cups chocolate frozen yogurt (I used Stonyfield fat free chocolate)

Pie Directions:

Pre-heat oven to 350 degrees

Spray a 9-inch springform pan with cooking spray, set aside

To make the crust, grind up about 25 gingersnaps in a food processor until fine; set cookie crumbs aside

Melt 4 tablespoons of butter in the microwave and pour over cookie crumbs

Add 2 tablespoons of granulated sugar and mix until well combined

Pour mixture into springform pan

Bake for 8-10 minutes or until firm

Remove from oven and allow to cool

Remove vanilla frozen yogurt from freezer a few minutes before use

Place the yogurt into a bowl and fold in the pumpkin and pumpkin pie spice until well combined

Spread pumpkin layer over crust and freeze for about 10 minutes

Meanwhile, remove the chocolate frozen yogurt from the freezer so that it is softened

Spread chocolate yogurt over the pumpkin and freeze covered with foil until ready to serve

Sauce Ingredients:

1/2 cup granulated sugar

2 tablespoons unsalted butter

1/2 cup heavy whipping cream

2 tablespoons light corn syrup

1 teaspoon sea salt

Sauce Directions:

Heat sugar over low to medium heat in a small sauce pan

Add butter; stir until butter is melted and fully combined with sugar

Reduce the heat to low and add cream; stir continuously until mixture bubbles

Remove pot from heat and stir in corn syrup

Add salt and stir

When it is time to serve the dessert, carefully remove outside of springform pan

Cut slices and drizzle with caramel cream sauce

Notes:

The sauce is best served immediately; if not, store it in the refrigerator and microwave on a low setting to re-heat at 15 second intervals stirring in-between

The sauce will firm up over the ice cream, don’t worry, that is supposed to happen!

[/print_this]

slice 4

I hope that everyone enjoys a happy and healthy New Year!

What dessert did you have for New Year’s Eve?

Peanut Butter Cheesecakes with Pretzel Crust

You already know that my pants don’t fit.  I don’t know about you, but I find it nearly impossible to diet around this time of year.  It is so cold out that the last thing I want to eat is salad.  What really appeals to me are dishes like chili, lasagna, fresh baked cookies… comfort food.  Add on holiday celebrations, office treats, and Christmas candy sales; I am hopeless.  Well, it is fair to say that I won’t lose any weight in the last week or so of December, but I will do anything I can not to gain more weight.  As a result, I am making an effort to lighten up some of the desserts I am making over the next few hours weeks.

cheesecake 2

Honestly, I don’t do well “giving up” anything. I don’t do well with portion control either.  The first step in trying to combat that is pre-portioning desserts.  The other thing I like to do is take out some of the fat and calories where it won’t be missed.  Previously I’ve made ice cream desserts that taste delicious but are made with lots of low-guilt ingredients.  Well, I decided to make Individual Peanut Butter Cheesecakes using lower fat cream cheese with a few more decadent ingredients to balance them out.

cheesecake 5

These cheesecakes are made with a crunchy pretzel crust, a creamy peanut butter filling and chocolate chips snuck in as a layer above the crust and throughout batter.  By the way, you’d be so proud of me.  I only ate two of them!  That may or may not be because I gave some to friends and left the rest in my parents fridge.  Sorry, Mom:-)

cheesecake 4

This recipe is actually very easy and revolves mostly around a food processor.  I figured if I needed to take out the appliance for making a crust, I might as well use it for the cheesecake batter too!

To begin, fill up your food processor with salted pretzels

pretzels2

Run them through until they are mostly fine crumbs

pretzels3

In a small bowl, pour melted butter over the pretzel crumbs

adding butter

Add sugar

adding sugar

Stir until all of the crumbs are moist

Mixing crust

Press a couple tablespoons of crust ingredients into two muffin tins sprayed with non-stick cooking spray; bake for about 6 minutes

crust pre-baking

When crust comes out of oven, layer with several milk chocolate and caramel chips

chips on crust 1

Regular chocolate chips would also work, but I really like the combination of caramel, chocolate and peanut butter; set pan aside

chocolate caramel chips

Meanwhile, prepare cheesecake batter; you can shake out the crumbs from the food processor, no need to wash it

cream cheese 1

Cream 2 blocks of cream cheese in the food processor

cream cheese 2

Add sugar, flour, vanilla and salt

adding sugar flour and vanilla

Combine well

sugar flour vanilla mixed

Add your eggs

add eggs

Measure 1 cup of peanut butter chips

peanut butter chips

Microwave about 45 seconds and stir; microwave in additional 20 second increments until chips are melted; note this will be very thick

melted pb chips

Add peanut butter to cheesecake batter

add peanut butter

Process until smooth and creamy

pb mixed in

Pour cheesecake batter into a separate bowl and fold in chocolate chips

fold in chips

Use a small ladle or large spoon to put about 1/3 of a cup of batter in muffin tins

badder in pan 1

Bake cheesecakes for about 15 minutes or until mostly firm

baked 2

Serve drizzled with chocolate and caramel or sprinkled with pretzel crumbs

cheesecake 12

[print_this]

Individual Peanut Butter Cheesecakes, lightened up

Makes 24 mini-cheesecakes

Ingredients:

1 1/2 cups finely ground pretzel crumbs

4 tablespoons melted butter

3/4 cup + 2 tablespoons granulated sugar, separated

1 8-ounce block fat free cream cheese, softened

1 8-ounce block reduced fat cream cheese, softened

2 tablespoons all-purpose flour

1 teaspoon vanilla

1/2 teaspoon salt

2 eggs

1 cup peanut butter chips*, melted

1/2 cup milk chocolate and caramel chips

1/2 cup mini semi-sweet chocolate chips

Directions:

Pre-heat oven to 350 degrees

To begin, fill up your food processor with salted pretzels and run them through until finely ground

In a small bowl, pour melted butter over the pretzel crumbs

Add 2 tablespoons sugar and stir until all of the crumbs are moist

Press mixture into two sets of muffin tins sprayed with non-stick cooking spray; bake for 6 minutes

When crust comes out of oven, sprinkle a few milk chocolate and caramel chips into each cup; set aside

Shake crumbs out of food processor and use it to prepare cheesecake batter

Cream 2 blocks of cream cheese in the food processor

Add sugar, flour, vanilla and salt; cream until well combined

Add eggs and mix well

Add melted peanut butter chips to cheesecake batter and process until smooth and creamy

Pour cheesecake batter into a separate bowl; fold in chocolate chips

Use a small ladle or large spoon to put about 1/3 of a cup of batter into each cup

Bake cheesecakes for about 15 minutes or until tops are mostly firm

Notes:

*You can replace these with regular peanut butter (not natural)

The peanut butter flavor isn’t really strong; some people may prefer this but I may try increasing the amount of peanut butter chips next time (using regular peanut butter could also help)

[/print_this]

cheesecake 7

cheesecake 11

Are you worried about weight gain during the holidays?

Topped with Marshmallows

It seems that there are two types of people when it comes to a Sweet Potato Casserole: Those who cover theirs with toasty melty marshmallows, and those who don’t.  Do you think I am biased?

sweet potatoes 12

You already know I love to sneak dessert-like side dishes onto my table.  Why wouldn’t I top my Sweet Potato Casserole with candy? To be honest, this is the way I grew up eating sweet potatoes.  Each time I see a recipe for a casserole topped with something delicious like a pecan streusel or turned savory I’m tempted to try it, but why mess with something that is just right?

This recipe is actually a lot healthier than you might think.  It is filled with nutrient-dense sweet potatoes, canned pumpkin (yes, pumpkin!), spices and and a secret ingredient:

sweet potatoes 6

I got the idea of using pumpkin butter in a Food and Wine recipe a couple of years ago.  I haven’t turned back since.

The other secret to this recipe is the roasted sweet potatoes.  Yes, you can microwave them to cut down on time, but roasting them adds so much flavor.

To begin, line a cookie sheet or jelly roll pan with foil and non-stick spray.  Top with your sweet potatoes and poke holes in them to prevent any oven explosions

sweet potatoes 2

Roast them for an hour or so, or until they are nice and tender to the touch

The softer they are, the easier they will be to peel.  I usually roast the sweet potatoes the night before so that I can peel them easily when they are cool, no burnt fingers required

Place them in a mixer with a can of pumpkin and combine until most of the mixture is pureed but some chunks still exist (you can also mash by hand if you don’t have a mixer)

Add in your pumpkin pie spice, pumpkin butter, a dash of salt and a bit of vanilla

sweet potatoes 7

Once well-combined, place in a large greased baking dish

sweet potatoes 8

Cover with foil and bake until hot

sweet potatoes 9

Remove the baking dish from the oven and top with marshmallows

sweet potatoes 10

Broil for a minute or two, until your marshmallows are lightly browned.  I recommend putting foil or a sheet pan below the baking dish in case you have any drippings

sweet potatoes 11
Sweet Potato Casserole
Serves 12

Ingredients:
8-10 medium sweet potatoes, about 5 pounds
1 15-ounce can of pumpkin, (not pumpkin pie filling)
1 cup pumpkin butter
2 teaspoons pumpkin pie spice
1/2 teaspoon salt
1/2 teaspoon vanilla
1 1-lb bag of mini marshmallows

Directions:
Pre-heat oven to 400 degrees
Line jelly roll pan or cookie sheet with foil and non-stick cooking spray
Poke sweet potatoes with a fork and spread out on baking sheet; roast in oven for about an hour or until they are tender
Once sweet potatoes are cool, peel them; cut a slit in the skin of each sweet potato and then peel with fingers
Place them in a mixer with pumpkin and combine until most of the mixture is pureed but some chunks still exist (you can also mash by hand if you don’t have a mixer)
Add pumpkin pie spice, pumpkin butter, salt and vanilla
Once well-combined, place in a large baking dish sprayed with non-stick cooking spray
Cover with foil and bake about 30 minutes or until hot
Remove the baking dish from the oven and top with marshmallows
Put oven on broil and bake casserole for 1-2 minutes, or until marshmallows are lightly browned

Which camp are you in? With marshmallows or without?

Pumpkin Chocolate Cheesecake Bars

Crispy gingersnap crust, rich chocolate cheesecake layer and a light pumpkin cheesecake filling, i.e. a delicious dessert just in time for Thanksgiving.

My favorite pumpkin chocolate cheesecake bars of all time!

I may have served eight (yes, 8) varieties of pick-up desserts at my Thanksgiving with Friends, but these Pumpkin Chocolate Cheesecake Bars won me over as the number one pick for the evening.  That wasn’t easy because all of the desserts were decadent and delicious.  Maybe it was the combination of two of my favorite flavors, pumpkin and chocolate.  Maybe it was the surprising spice from the gingersnap cookie crust.  Maybe it was the lovely creamy texture with a perfect thin crispy crust in one bite.  Maybe it was the balance of richness and lightness that allows you to eat not just one, but four two.  Frankly, it doesn’t matter.  These are delicious and if you like the sound of any of that, you must make them.

We have these every year because they are SO good!

I saw Sharon’s recipe on the Curvy Carrot about a month ago and new right away I had to make it myself.  There were a couple of modifications, but the recipe is largely based on hers.  Just like she said, they were easy but a little time consuming.  Definitely worth every minute, though!

One of my all-time favorite desserts!

Pumpkin Chocolate Cheesecake Bars
 
Crispy gingersnap crust, rich chocolate cheesecake layer and a light pumpkin cheesecake filling, i.e. a delicious dessert just in time for Thanksgiving.
Author:
Recipe type: Dessert
Makes: 36 small bars
Ingredients
Crust:
  • 275g (2 cups + 2 tablespoons) gingersnap cookie crumbs (about 35 cookies)
  • 85g (6 tablespoon) unsalted butter
Filling:
  • 454g (2 8-ounce packages) light cream cheese softened at room temperature
  • 371g (1¾ cup) granulated sugar
  • 165g (3 large) whole eggs
  • 16g (2 tablespoons) all-purpose flour
  • 240g (1 cup) pumpkin puree (not pumpkin pie filling)
  • 5 milliliters (1 teaspoon) vanilla
  • ¼ teaspoon ground cinnamon
  • ⅛ teaspoon ground ginger
  • ⅛ teaspoon ground nutmeg
  • ½ g (1/8 teaspoon) salt
  • 170g (6 ounces) semi-sweet chocolate, roughly chopped
  • 28g (2 tablespoons) unsalted butter
Instructions
  1. Pre-heat oven to 325 degrees
  2. Line a 13×9 pan with tin foil and spray with cooking spray, set aside
Prepare crust:
  1. Stir together gingersnap crumbs and melted butter
  2. Spread evenly into prepared pan using fingers to push down crust mixture and set aside
Prepare filling:
  1. In the large bowl of an electric mixer with whisk attachment, whip cream cheese on medium high speed for several minutes until creamy and lumps are gone
  2. Add granulated sugar and combine on medium-high speed well until light and creamy
  3. Beat in eggs, one at a time, mixing on medium speed in-between; mix in flour on low speed
  4. Add pumpkin, vanilla, cinnamon, ginger, nutmeg, and salt and mix on medium speed until mixture is thick and creamy
  5. Now, separate 380 grams (1¾ cups) of the pumpkin cheesecake filling and set aside in a large bowl
  6. Melt chocolate chips and butter in a small saucepan over low heat; mixture will get very thick
  7. Add chocolate to the pumpkin filling that you set aside and stir thoroughly
  8. Pour chocolate batter over crust and bake for 15 minutes
  9. Remove from oven and pour remaining pumpkin cheesecake filling on top
  10. Bake for 35-45 minutes or until edges begin to separate from foil and middle bounces slightly when touched
  11. Refrigerate for at least 4 hours or overnight
  12. Remove cheesecake from pan and cut into small bars
Notes
Adapted from The Curvy Carrot
I used light cream cheese because I wanted a final product that wasn’t overly rich, but regular cream cheese would work as well
When cutting the bars, I recommend cleaning your knife with a paper towel between slices to keep from contaminating the layers with one another

Make something from the blog? Be sure to share it onInstagram with the tag #KeepItSweetDesserts.

You might also like:

Pumpkin Cinnamon Roll Cheesecake

Pumpkin Cinnamon Roll Cheesecake

Funky Monkey Cheesecake Bars

Funky Monkey Cheesecake Bars

Cappuccino Cheesecake Cake Bars

SONY DSC
SONY DSC

Low Fat Peanut Butter Mousse

Although I’d like to eat these or these every day, my body doesn’t seem to think that is acceptable enough for fitting into my clothes!  As a result, I am constantly thinking of dessert ideas that are a little more healthy.  Don’t get me wrong, when you need a brownie, you NEED a brownie, but there are some occasions when I can go with something on the lighter side.

About a month ago, I contacted Chobani about using their products in recipes on the blog.  Lucky for me, the woman I wrote to was more than happy to help out.  Just a few days later I received several coupons for FREE Chobanis in the mail!  Now lucky for you, I am going to give some away.  All you have to do is leave a comment on this post between now and Monday night at midnight eastern.  I’ll pick a random number to choose a winner for 6 free yogurts.

Tonight was the perfect opportunity to experiment with the yogurt.  I had a relaxing night planned for myself and wanted something easy, tasty and light (we are going to a wedding tomorrow night and there is a little black dress waiting for me in the closet).  After considering the ingredients I had on hand, I decided to make Low Fat Peanut Butter Mousse.

This is an extremely easy recipe.  All you need are these:

all ingred

This:

mini chopper

I love my mini chopper.

And this:

splenda

Regularly I try to limit artificial sweeteners in my diet, but I have nothing against using them in small doses.

To make the mousse follow these steps:

Let your cream cheese sit out for a bit to soften, and put that in the food processor first.  You can read why, here.

cream cheese measured

Then blend in your Chobani.

empty yogurt

And then the powdered stuff.  The Splenda too.

measuring PB2

Whirl it all together to get it nice and creamy.  You should pause to scrape the sides once or twice.

mix in chopper

Then serve, you don’t even have to share!

mousse

Which is a good thing, since I devoured it:-)

all gone

[print_this]

Low Fat Peanut Butter Mousse

Serves 1; approximately 180 calories

Ingredients:

2 tablespoons fat free cream cheese, softened

1 small 6 ounce container nonfat plain Chobani

2 tablespoons of PB2*

1 tablespoon of Splenda, or more to taste

Directions:

Run cream cheese through food processor until creamy.

Add yogurt and blend well.

Blend in PB2 and Splenda, scraping the sides of the chopper once or twice.

Eat alone or with your choice of topping.

[/print_this]

Notes:

*Trader Joes peanut flour is similar and can be used instead.  Alternatively, a tablespoon of regular natural peanut butter would work as well.  Nutrition information would vary.

If you don’t have a mini chopper, you could use a hand mixer or a small blender instead.

I know this isn’t really “mousse”, but the texture is so creamy that is the best way to describe it.

This would be great served over sliced bananas or as a dip for sliced apples.

Suggested toppings include dark chocolate shavings, cookie crumbs or chopped peanuts.

Don’t forget to comment for the chance to win FREE Chobani!!  Maybe I’ll even throw in a surprise:-)

Layers of Fall

This fun fall dessert is full of layers like apple pie filling and pumpkin cake.  The trifle combines your favorite fall desserts into one!

One of my favorite desserts for entertaining (and eating) is a trifle.  It allows you to incorporate lots of different textures and flavors into one dish.  It also is visually impressive but almost always EASY to make.  Historically I have made summer trifles with berries, angel food cake or pound cake and cool whip and pudding.  It’s September, now, so fall flavors are constantly on my mind.  Pumpkin. Apples.  Cinnamon.  This Fall Trifle takes some prep time but is very easy to put together.

Fall Trifle: This fun fall dessert is full of layers like apple pie filling and pumpkin cake.

First thing I do when making a trifle is figure out how I will get in all of the textures I want: Creamy, Crunchy, Soft.  I also consider the look of the trifle, what are some colors that will go well together but not blend too closely to one another?

For crunch a few cookie options came to mind (graham crackers and gingersnaps especially), so when I found these in my parent’s kitchen I grabbed them!  I think of them as a ginger-spiked Oreo:-)  Regular gingersnaps would have worked too.  I like the little spicy bite with all of the other sweet ingredients.

ginger cookie

I just crushed them in a Ziploc bag.  No food processor required since you don’t want crumbs, just small chunks of cookies!

crushed cookies

Next I thought about the creamy ingredients.  I always include cool whip in trifles because it is light and creamy and tailors well to any flavor profile.  Fresh whipped cream would be even better (hmmm maybe cinnamon whipped cream!), but I was going for some less indulgent ingredients.  In addition to the whipped cream I chose to use vanilla pudding which is creamy but thicker in texture.

pudding ingredients

One of my favorite guilt-free EASY recipes is pumpkin spice cake.  All that you need is spice cake mix, pumpkin, egg whites (or egg beaters) and water.  I can promise you that the cake will be moist and flavorful.  No one ever knows that it is low fat.  Use this as a base for muffins or cupcakes with cream cheese icing!

spice cake ingredients

In the summer, berries are usually a perfect trifle component.  Sliced banana is also tasty, but sometimes the mushier texture doesn’t provide enough contrast.  What dessert is more fall than apple pie?  Enter, apple pie filling!

cropped apples

When you are ready to build your trifle, layout all of the ingredients and decide on an order for layering.  Consider texture and color for this.

trifle parts

For this trifle, layer the apple pie filling on the bottom of your trifle dish (a large glass bowl would work too).  The apples are a little too heavy to have in the upper layers.

apples in trifle

Next is the pudding.  Apples + pudding = slightly crunchy + creamy.

pudding on apples

The crumbled spice cake is next.

cake on pudding

Then cool whip for that cool and creamy addition.

cool whip on cake

Cookies next for another crunch layer.

This fun fall dessert is full of layers like apple pie filling and pumpkin cake.

After that, you repeat the prior layers except for the apple pie filling.  Leave cool whip as your final layer and decorate as you wish.  I scattered cookie crumbs and a couple pieces of the apple.

Fall Trifle: This fun fall dessert is full of layers like apple pie filling and pumpkin cake.

The layers don’t have to be perfect, does that mean I should call this rustic??

Fall Trifle: This fun fall dessert is full of layers like apple pie filling and pumpkin cake.

Serve with a long spoon for scooping.  Dig deep for that apple pie filling!

Fall Trifle: This fun fall dessert is full of layers like apple pie filling and pumpkin cake.

[print_this]

Fall Trifle

Serves 10-12

Ingredients:

Prepared apple pie filling (recipe below)

Vanilla pudding, 2 small boxes prepared (use instructions on box)

1/2 of prepared pumpkin spice cake (recipe below), broken up into small pieces

2 8-ounce containers of cool whip

2-3 cups of cookie crumbs (gingersnaps or a similar variety are recommended)

Directions:

Layer ingredients as follows-

Apple pie filling

Pudding

Spice cake

Cool whip

Cookie crumbs

Repeat, except for apples, leaving cool whip as final layer

Decorate as desired

Refrigerate prior to serving

Notes:

When layering ingredients, cover each prior layer completely.  You want to get a taste of each component in every bite.  Plus, the view from the side is prettier when you can see each element

Instead of or in addition to the cookies, toasted walnuts or pecans would make a great crunch layer

If you like butterscotch, butterscotch pudding would probably be a great replacement for vanilla

I chose to use lower fat ingredients in this recipe because 1) I knew that the way it comes together it does NOT taste low fat, and 2) the rest of the desserts planned for our night were extra indulgent.  This version was made with fat free cool whip and fat free, sugar free pudding

Spice Cake:

Ingredients:

1 box spice cake mix

1 small can (15 oz.) pumpkin, not pumpkin pie filling

2 egg whites or 1/4 cup egg replacement

1/2 cup water

Directions:

Pre-heat oven to 350 degrees.

Spray 9×13 pan or baking dish with cooking spray (if you want to, you can make into 24 cupcakes instead and save the extra; they will freeze well)

Combine all ingredients until batter is smooth.  A mixer is easier but this can also be done by hand

Spread batter into baking dish and bake for approximately 30 minutes or until knife or toothpick comes out clean

Allow to cool before using in trifle

Apple Pie Filling

Ingredients:

3 golden delicious apples, sliced (peeling optional)

2 tablespoons brown sugar

1 teaspoon all-purpose flour

Dash of cinnamon

1 1/2 tablespoons butter

3 tablespoons granulated sugar

Directions:

Combine apples, brown sugar, flour and cinnamon.  Set aside

Melt butter in medium pan over low-medium heat

Sprinkle in granulated sugar and stir until mixture is lightly browned

Pour apple mixture into pan and stir

Cook over medium heat for approximately 30 minutes or until apple slices are softened

Allow to cool before using in trifle

[/print_this]

What are your favorite flavors of fall?

Matt’s Chocolate Chip Banana Bread

matt tasting banana

I like bananas…

Last week we were going to my godparents house for dinner and Lauren said she would make banana bread. She was feeling a little under the weather, so I said I would do it.

I basically did Lauren’s Upside Down Banana Bread Recipe without the caramelized bananas plus chocolate chips (my favorite).  I didn’t think the caramelized bananas would travel well, so I dropped that part of the recipe.  Here is a link to the original recipe, which I doubled to make two loaves.

Sooo, it turns out that baking is really hard.  I’m normally pretty good in the kitchen when it comes to cooking. I like to experiment with different spices and usually just improvise with whatever ingredients are available. Then there is my basic rule of thumb, “when in doubt add cheese.”

However, I discovered this is not really how baking works. You have to follow recipes and be exact.  I am bad at that. I am used to just throwing a little bit of this and a little bit of that into whatever I’m making and see how it comes out!

First step, “raisin bran…” What?! Raisin Bran?! The first obstacle was reading Lauren’s handwriting. It actually said “mash bananas,” Lauren got a pretty good laugh out of that one. I’m glad she was there to answer all my questions.

I combined the dry ingredients in the mixing bowl and then did the wet ingredients in a different bowl. I mashed the bananas, added sugar, eggs, oil, applesauce and vanilla and mixed it all together. I poured the wet ingredients on top of the dry ingredients, flipped the switch on the mix master and done!

I definitely made that seem much easier than it was. It took me like 15 minutes to mash the bananas together, was a wooden spoon the right tool to use? Probably not. I switched to a fork and that didn’t help much. Can anyone help tell me what I should use next time?

Here are a few pictures to document the experience.

matt studying recipe

Following Lauren’s advice – reading through the whole recipe before doing anything.  If I could only decipher her handwriting…

all ingredients

What you’ll need…

dry ingred

Mix the dry ingredients

mixing banana

I can make chicken parm, roast a turkey or braise a brisket, but I seemed to be having trouble mashing bananas!

mixing wet

Add all the wet ingredients and mix.  Apparently sugar is a wet ingredient?

mixing all ingred

Put them on top of the dry ingredients and whisk

batter with chips

To finish it off, I reverted to my brand new baking rule of thumb, “when in doubt, add chocolate chips.” I added almost a whole bag. Lauren thought this was funny, but I like chocolate chips!  No need to measure, that’s just how I roll…

in oven

Bake at 350 for ~35 minutes, I had to ask Lauren to check if they were done.  Just like she asks me when the chicken is done.  Role reversal!

done

I baked them in this Williams Sonoma pan. Lauren says they are pumpkins, but I say bring it to the beach to make sand castles!

I’m going to let Lauren do the baking from now on, she definitely makes it seem easier than it is.  So, if you think baking is hard, you are NOT alone!

From now on, I will stick to what I’m really gifted at: tasting!

[print_this]

Matt’s Chocolate Chip Banana Bread

Ingredients:

5 medium extra ripe bananas (to make 2 cup mashed)

1 cup of sugar, separated

2 large eggs + 2 large egg whites

2 tsp vanilla

1/2 cup vegetable or canola oil

1/2 cup unsweetened applesauce

1 cup all-purpose flour

1 cup whole wheat flour

2 tsp baking powder

2 tsp cinnamon

1/2 tsp salt

1 1/2 cups mini semi-sweet chocolate chips

Directions:

Preheat oven to 350 degrees.

Spray 2 loaf pans with cooking spray.

Combine flours, baking powder, cinnamon and salt.

Mash together bananas and sugar.

Whisk remaining wet ingredients into banana mixture (vanilla through applesauce).

Add wet ingredients to the dry and combine.

Stir in chocolate chips.

Pour batter into pans and bake for 25-30 minutes or until knife comes out clean.

Allow to cool in pan before removing.

Slice and enjoy!

[/print_this]